A quiet, muffled, or wind-distorted voice can be salvaged, and Bride&Groom.video offers two plugin chains in Adobe Audition for this purpose: the standard Chain A for clean audio and the more robust Chain B for noisy or ambient audio. Both start with a high-pass filter on Pro-Q 4, stabilize the dynamics with a compressor (Pro-C 2 or Sonible smart:comp 3), apply a surgical and then an AI-tonal pass through Waves Curves AQ, and finish with a de-esser and a Hard Limiter. Below, we’ll break down the basics of EQ and compression in these chains, the specific steps involved, and where AI tools like Curves AQ, smart:comp 3, and Auphonic really make a difference.
How can you transform ordinary sound into exceptional audio for your wedding films?
In wedding video editing, audio mixing plays an important role in creating standout highlights. Without proper work with audio, recordings of speeches or letter readings might come off as too quiet, muffled, or plagued by background noise. Professional sound mixing enhances sound quality, providing clarity and richness. Therefore, to strike the perfect balance between video and audio content, it’s essential to give careful consideration to this process.
Audio Plugins and Tools We Use
So, what’s our approach to nailing the perfect result in each project? Above all, we choose the right software for mixing audio for video. While there are many options out there, we primarily rely on the Adobe suite, specifically Adobe Audition, because it’s highly convenient for working with speeches.
Once we’ve settled on the sound mixing software, the next natural question is: which tools within this program should be employed to achieve professional quality? In this case, we navigate to the Effect Rack panel and load the preset that is used by every editor in our company. All third-party plugins mentioned in this article support Davince Resolve, Premiere Pro, and Final Cut.
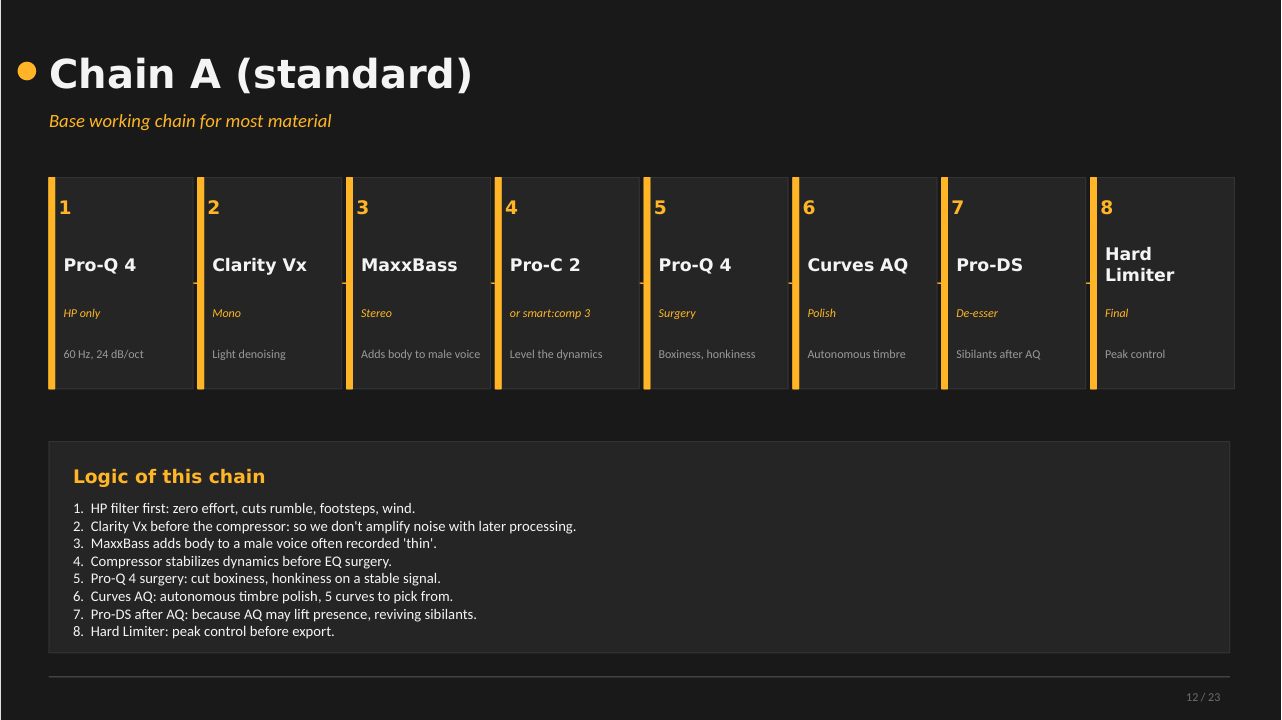
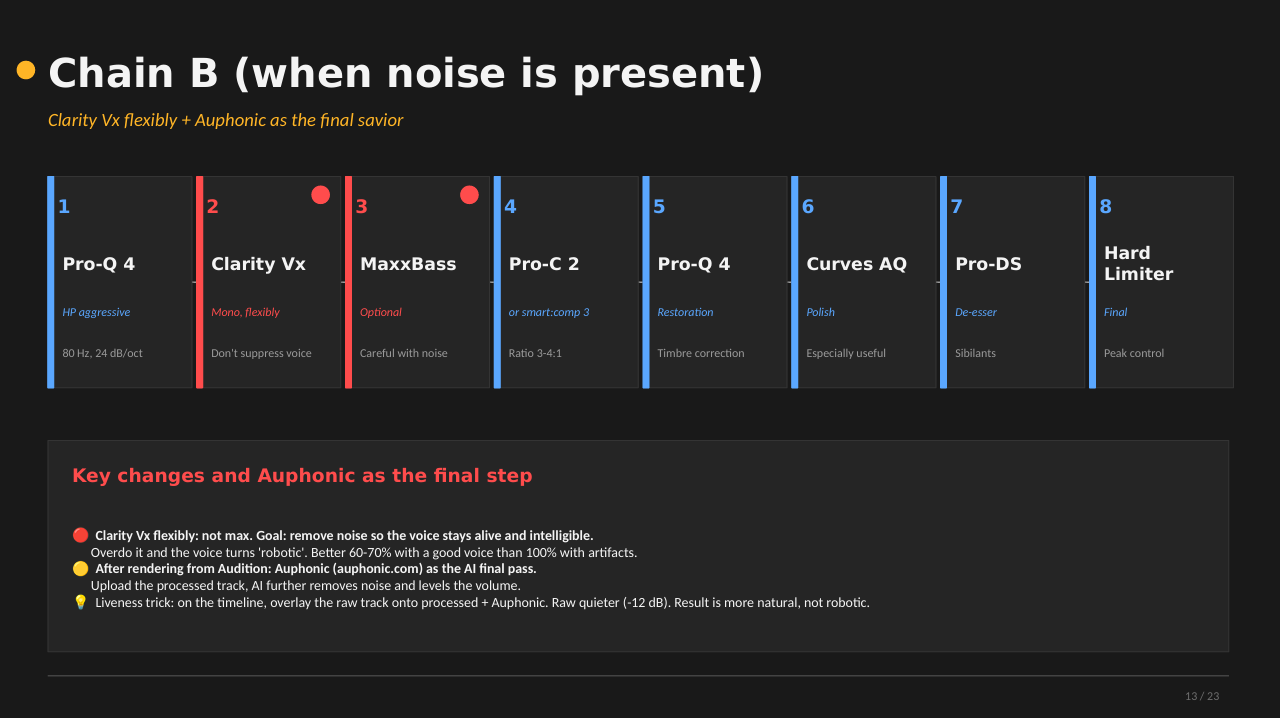
Each preset consists of 8 slots. Six of them form the core, which works for almost any speech, while the other two, Clarity VX and MaxxBass, are turned off by default and switched on only when a specific recording calls for them. The list can always be expanded or narrowed depending on how the audio was recorded: where the microphone sat on the groom or bride, how close it was held to their mouth, and so on. Take a typical outdoor ceremony, where the audio came in at -12 dB with background ambient noise. Our goal is to separate the voice from the background (not completely) and create a pleasantly compressed sound, so even the quietest words come through without rewinding.
Step 1. FabFilter Pro-Q 4, high-pass filter
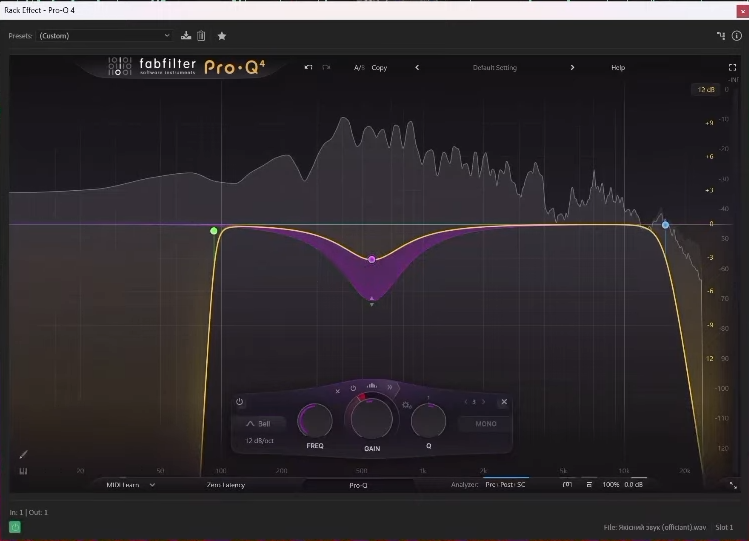
The first step is to cut the low end with a steep high-pass filter in Pro-Q 4. Set the cutoff to around 60 Hz for clean material (Chain A) or 80 Hz for noisy material (Chain B), with a slope of 24 dB/oct. There’s almost no useful information in the voice below this range, so cutting it early removes hum, footsteps, wind, and low-frequency thumps before they reach the rest of the chain. We use Pro-Q 4 twice: here as a surgical high-pass filter, and again later (Step 5) for tonal correction.
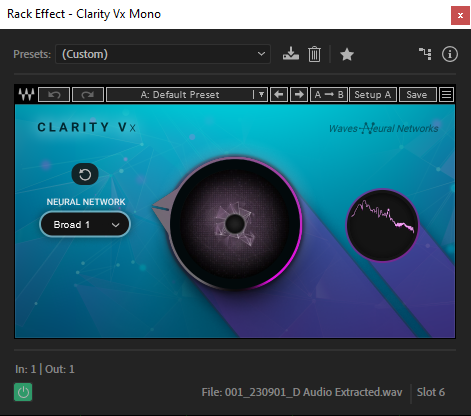
Step 2. Waves Clarity VX, optional early cleanup
If the recording is noticeably noisy, we bring in Clarity VX early, in mono, before compression. It runs on Waves’ AI technology and can pick out the voice and cleanly isolate it even from harsh background or ambient noise. Here’s the important nuance, and it’s the opposite of how we used to work: we apply noise reduction before the compressor, not after. If the compressor goes first, it lifts the noise in the quiet passages, and then Clarity VX ends up fighting noise that sits right at the vocal level, which gives a worse result.
The key here is restraint. In Chain B we keep it flexible, around 60 to 70% rather than maxed out, so the voice stays natural instead of turning “robotic.” Better to run 60 to 70% on a good voice than 100% with artifacts. For tougher cases, there’s its big brother, Clarity VX Pro.
Operating it is straightforward: you mainly work one large knob, turning it clockwise to strip out artefacts without harming the source. For a full film where you want a natural sound and a little room tone left in, around 25% is often enough. When you need to suppress more of the background, you can push to 50 to 75%. On noisier Chain B material, though, we keep it flexible, around 60 to 70% rather than maxed out, so the voice stays alive instead of turning “robotic.” Better to run 60 to 70% on a good voice than 100% with artefacts.
Step 3. Waves MaxxBass, optional low-end boost
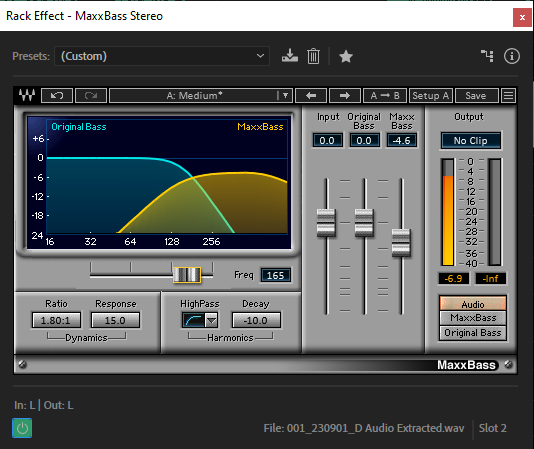
When the vocals lack body, we bring in Waves MaxxBass. It doesn’t just lift the existing low frequencies; it generates higher harmonics from the low end you already have, giving a fuller, more solid sound without overloading the signal. Use the standard “Medium” preset, set the operating frequency to roughly 150 to 256 Hz depending on the voice, and adjust the MaxxBass knob to taste. In Chain A this is a stereo effect that adds body to a male voice that was often recorded a little thin. Use it carefully on noisy material, though: boosting the low end can also lift low-frequency noise, so on a dirty recording it’s better left off, which is why this step is optional in Chain B. Place it before the compressor, so the added low end gets smoothed out afterward.
Step 4. FabFilter Pro-C 2 (or Sonible smart:comp 3), compression
Next comes compression in FabFilter Pro-C 2. The compressor keeps speech volume even, since people without public speaking experience rarely hold a steady level. Their speech swings between loud and quiet parts, and the compressor smooths out those swings so quieter moments come up and louder ones settle down.
We use a ratio of about 3 to 4:1, an attack of 5 to 10 ms (any faster and it starts clipping consonants like p, t, and k), a release of 80 to 150 ms depending on the speech tempo, and a soft knee. Then we adjust the Threshold, Input, and Output so that after compression the sound isn’t louder, just more even.
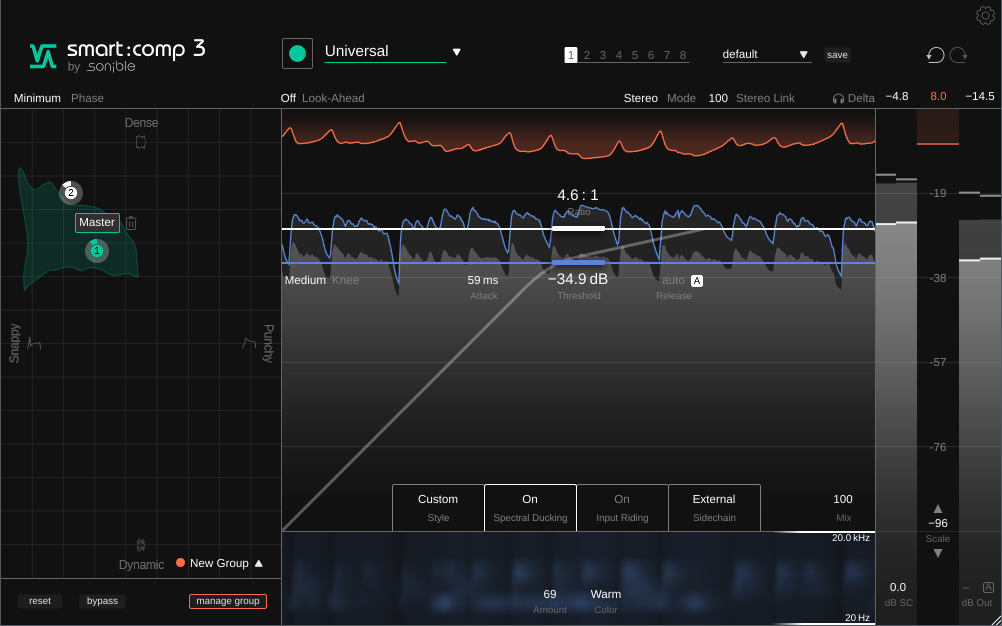
As an alternative, we’re leaning more and more on Sonible smart:comp 3, an AI compressor with spectral compression. The workflow: set Profile to Voice, then Speech, and Style to Universal to start. Let it “Learn” from 10 to 15 seconds of clean voice, then A/B against bypass at matched volume. After the Learn phase, three main controls do the work: Punch (protects the attack of consonants), Tightness (how dense the compression feels), and Color (a subtle tonal nuance). The target stays the same, a ratio of around 3 to 4:1.
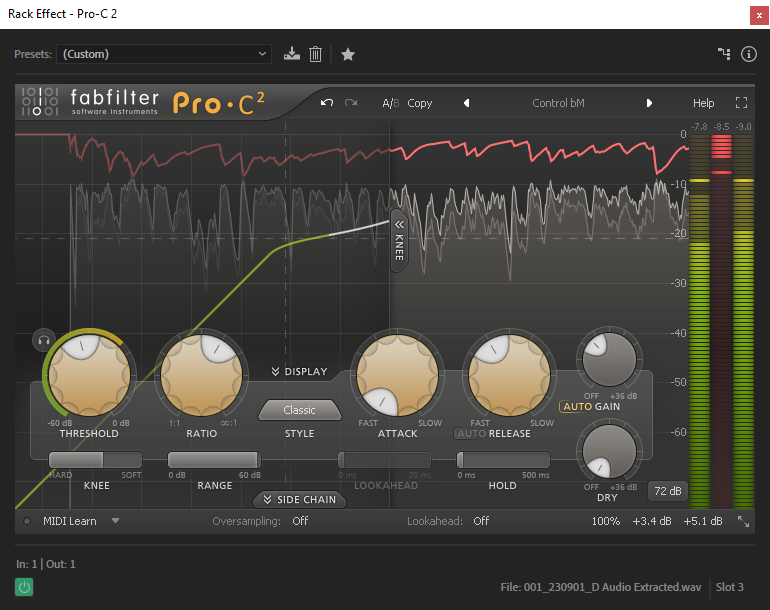
By the way, why run the Pro-C 2 compressor after Waves MaxxBass? Good question. If MaxxBass came after the compressor, the audio could distort, since the low frequencies it adds might push past 0 dB. The program truncates anything above 0 dB, and that clipping causes distortion. Placing MaxxBass first means the compressor can then be set to keep the whole signal from crossing 0 dB.
Order matters more broadly here too. The classic chain is EQ before compression, but that really only suits clean studio recordings. For wedding and field-recorder material, we flip it: compressor first, then EQ. Stabilizing the shifting volume first gives us a steady level to work on, so the surgical EQ that follows is cutting into consistent audio rather than chasing a moving target. The high-pass filter always stays first, ahead of both.
Step 5. FabFilter Pro-Q 4, restoration and tonal correction
Once the level is under control, we come back to FabFilter Pro-Q 4 for a second, more musical pass. Working from the vocal frequency map, here’s what we usually do.
Boxiness at 250 to 500 Hz shows up in almost every room recording, so we apply a Bell filter of about -3 dB around 300 Hz. Nasality at 1 to 2 kHz calls for a Bell of about -2 dB, but go carefully here, since this range carries a lot of intelligibility. We leave the body at 500 Hz to 1 kHz alone, as that’s the foundation of the voice. Presence at 2 to 5 kHz gets a light +1.5 dB lift for clarity, and air at 9 to 16 kHz gets a +2 dB shelf, with a de-esser afterward to keep it in check (for a lavalier mic tucked under a jacket, +2 dB at 9 to 12 kHz helps open it back up).
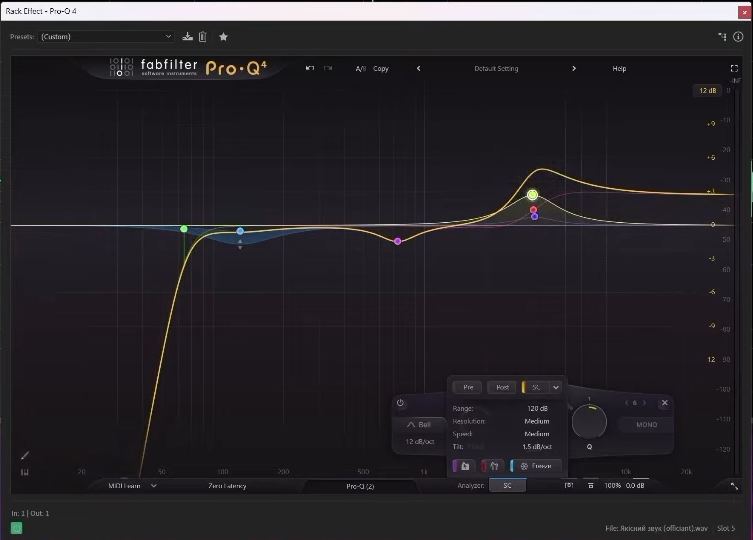
To find a problem frequency instead of guessing, use the sweep method: make a Bell filter with Q at 5 to 10 and gain at +12 dB, sweep slowly across the spectrum from 100 Hz to 8 kHz, and listen for the worst spot. Once you’ve found it, cut that same range by -3 to -6 dB and widen the Q to 1 to 2. This is where a rough recording turns into a clear, pleasant voice.
Step 6. Waves Curves AQ, tonal polish
After the surgical EQ pass, Curves AQ handles the tonal “liveliness” of the voice. It’s a standalone EQ with a simple four-step workflow: Learn (let it listen to 10 to 20 seconds of clean vocals), let it generate five spectral curves, pick the one that sounds most natural rather than the most pronounced, and fine-tune from there (Boosts/Cuts, the Static/Dynamic balance, and the four anchors).
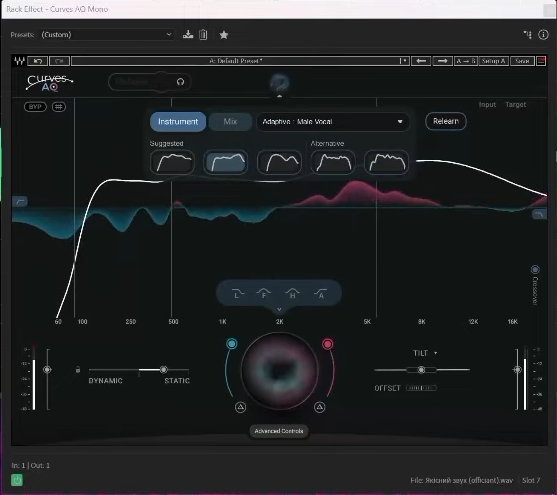
What Curves AQ doesn’t do is just as important. It’s a tonal polish, not a replacement for Pro-Q 4 on surgical EQ, not a high-pass filter for rumble, not Pro-DS for de-essing, and not Clarity VX for noise. It sits between the surgical EQ and the de-esser in the chain, not in place of any of them.
AI assistants: Curves AQ, smart: comp 3, and Auphonic
These tools are powerful once you understand the fundamentals, because the AI proposes options and you’re the one choosing and correcting by ear. Curves AQ offers five EQ curves, and since you already know what EQ and Q do, you pick the one that sounds most natural instead of grabbing the first. smart:comp 3 sets its parameters automatically, and because you know what Ratio and Attack are, you can pull the Punch back when it’s smothering the consonants rather than guessing. smart:comp 3 is covered above as a compressor alternative (Step 4), and Auphonic is the final pass described earlier for tough cases.
We still keep older tools like Adobe’s Enhance Speech in mind for badly damaged audio, but it can introduce its own distortions, so the three tools above carry most of the work now. The principle stays the same throughout: AI offers the options, and we choose and adjust with our ears.
Auphonic, an AI finishing tool for tough cases
When Audition has done all it can, we send the rendered track to Auphonic. Its AI removes more noise and levels the volume to a target LUFS, and it’s free for up to two hours a month. This works precisely because we kept Clarity VX flexible earlier: the voice still sounds lively rather than sterile, and Auphonic handles the rest.
Here’s another trick for a natural result. On the timeline, place the raw track underneath the processed one, turned down by about -12 dB. That bit of untouched audio underneath keeps the voice sounding real instead of robotic.
Step 7. FabFilter Pro-DS, de-esser
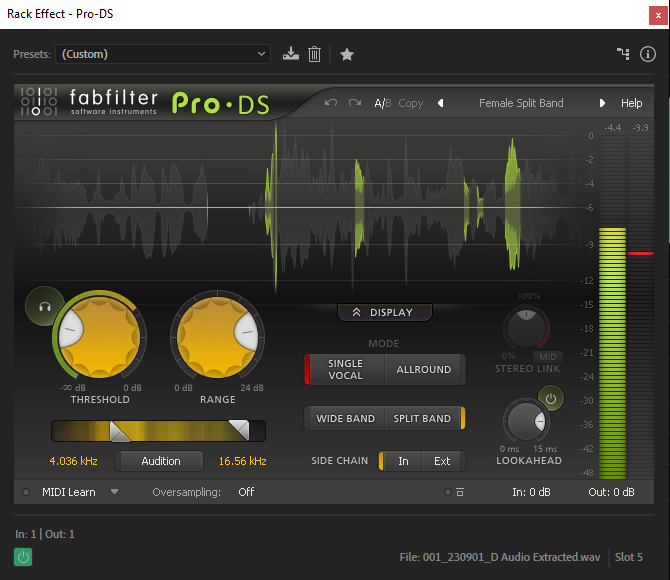
After the EQ and AI polish have added brightness, sibilant sounds (the hisses and whistles) can start to stand out more. Rather than going back to the equalizer, we bring in the FabFilter Pro-DS de-esser, which is great at taming those sounds, especially in female vocals. Pick the “Single Vocal, Female Split Band” preset, then adjust the Threshold (which works much like a compressor) and the Range (how hard the de-esser clamps down on the sibilance). The rule is simple: after any lift in the high frequencies, say a boost at 10 kHz, a de-esser is a must.
Step 8. Hard Limiter, final peak control
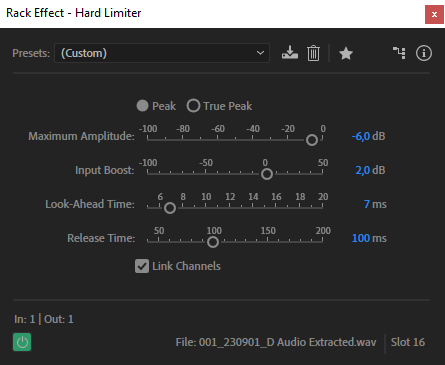
The final step is the Hard Limiter, which catches any remaining peaks and sets a safe ceiling without adding distortion at the very end of the process. Since wedding videos are mostly watched at home on TVs, computers, and phones, we leave a little headroom for all of them and set the limit to around -6 dB for both vocals and music. When full mastering isn’t needed, this simple, transparent limiting is all it takes before export.
When you entrust to edit your wedding films to us, rest assured that we give just as much attention to audio as we do to video files.
FAQ
What is sound mixing in filmmaking?
Sound Mixing is the technical process of working with each audio file (or audio channel), where audio plugins are applied, as described above, tackling tasks like compression, equalization, and the like.
Is sound mixing the same as sound editing?
Sound Editing is a creative process within editing software, encompassing tasks such as tweaking speeches by snipping unnecessary phrases from dialogues and handling both music and speeches concurrently. It involves adjusting the volume of music as necessary. Sound Editing may also cover the Sound Design process, where diverse sounds are blended for a comprehensive and immersive audio experience in the video.
How loud should background music be?
The ideal loudness for background music depends on the context. In filmmaking, it should complement dialogue without overpowering it. Typically, background music levels are set to enhance the mood without distracting from the main audio.
What decibel level should dialogue be?
Given that wedding videos are primarily crafted for home viewing on TVs, computers, and smartphones, we make sure to provide a volume buffer for all devices, editing the audio at -6 dB for both music and speeches. When you play the video, your ears will stay intact and healthy – we take care of our clients!
What is the difference between mixing and mastering?
Sound Mixing involves working with each audio file (or audio channel), whereas Mastering is the process of simultaneously working with all audio files (or audio channels) using a Master channel that amalgamates all audio channels. In this process, the editor enhances the sound to make it more vibrant, ensuring that all elements in the audio composition sound like a unified whole.
Should EQ come before or after compression?
It depends on the source. For clean, well-controlled recordings, EQ usually comes first, then compression. For raw field or recorder audio with uneven levels, it’s often better to compress first to stabilize the dynamics, then run a surgical EQ on the steadier signal. Either way, a high-pass filter comes first.
Can you just trust AI plugins?
Use them, but always judge their decisions by ear. Curves AQ might offer five different EQ curves, and smart:comp 3 can set compression parameters on its own, but the final call, picking the most natural-sounding result and tweaking it, is yours. That only works if you understand what EQ, Q, ratio, and attack actually do.
—
Terminology
Audio plugin – a small piece of software that runs inside an editing program to shape sound in a specific way, such as removing noise or evening out volume. Wedding editors chain several plugins together to turn raw speech recordings into clean, pleasant audio.
Compression – an audio process that evens out volume, making quiet words louder and loud moments softer. It matters in wedding speeches because most speakers aren’t trained presenters and their volume drifts as they talk.
Equalizer (EQ) – a tool that raises or lowers specific frequency ranges in a recording. Cutting unneeded lows and lifting the 1 to 4 kHz range, where speech clarity lives, makes vows and toasts much easier to understand.
High-pass (low cut) – an EQ move that removes everything below a chosen frequency. A steep high-pass around 60 to 80 Hz clears rumble, wind, and handling noise without touching the voice. It’s almost always the first step in the chain.
Q – the width of an EQ band. Narrow (5 to 10) is for surgical cuts, while wide (0.5 to 1.5) shapes the overall timbre of the voice.
Boxiness / honkiness – two common problem tones in speech. Boxiness sits around 250 to 500 Hz and is typical of room recordings, while honkiness is a nasal, “in the nose” quality around 1 to 2 kHz.
Ratio / attack / release – the core compressor controls: how hard it squeezes (about 3 to 4:1 for voice), how quickly it reacts (5 to 10 ms), and how quickly it lets go (80 to 150 ms for dialogue).
Sibilance – the harsh hissing on “s” and “sh” sounds that can become distracting after high frequencies are boosted. It tends to be more noticeable in female voices and is tamed with a de-esser rather than more EQ.
De-esser – a plugin built to reduce hissing and whistling sounds in speech without dulling the rest of the voice. It’s a standard step when polishing wedding vows and speeches for the final film.
Adaptive / autonomous EQ – an AI equalizer, such as Waves Curves AQ, that analyzes a recording and generates curves tailored to it. It’s used to polish the spectral balance after manual EQ, not to replace it.
Limiter – a safety tool placed at the end of the audio chain that stops the sound from passing a set ceiling, preventing distortion. Wedding films are often delivered with audio peaking around -6 dB so they play comfortably on TVs, phones, and laptops.
Decibel (dB) – the unit used to measure audio loudness in editing software, where 0 dB is the maximum before distortion sets in. Negative values like -6 dB or -12 dB describe how much headroom the recording leaves below that ceiling.
LUFS – a unit of perceived loudness, and the target that a tool like Auphonic levels the track to for consistent volume across devices.