As 4K pushes wedding footage past a terabyte, uploading raw files to a remote editor gets painful, which is exactly the headache proxies solve. This guide defines a proxy as a lighter, lower-bitrate stand-in you edit with, then swap back to the originals for the final 4K render. It includes a resolution-and-codec recommendation table and step-by-step instructions for generating proxies in Premiere Pro, Final Cut Pro, and DaVinci Resolve, plus notes on naming, relinking, and keeping software versions matched. Made for videographers who outsource and want a smooth handoff.
The concept of using proxies – a simplified version of raw files – for post-production and exporting the final result with original high-resolution source files has been known for many years. However, while working as an external editing team with our client videographers, we have found some tricky moments not known to everyone. To ensure videographers and editors are on the same page, we’ve created this complete guide on using proxy videos while outsourcing editing.
Need to Send Large Files?
With the advent of large numbers of different modern cameras, video content has moved forward significantly, and the quality can be impressive.
As a consequence, file sizes have increased dramatically. A few years ago, a typical size of wedding footage was somewhere between 150GB and 300GB. Nowadays, when 4k becomes an industry standard, footage size can reach 1TB or more.
Unfortunately, modern fiber broadband is still not available in many neighborhoods. And if you need to share your footage with your editing team, it can become quite challenging to upload such large files to the cloud. And here’s where video proxy files come into play.
What are video proxies?
A proxy video is a simplified version of the original video, usually with lower resolution and a lower bitrate.
Some modern cameras allow you to record both original and proxy files at the same time.
If your camera doesn’t have this feature, or you just didn’t turn it on, you can always create proxy files from your original footage in all three major editing programs – Adobe Premiere Pro, Final Cut Pro or DaVinci Resolve.
Why use proxy files?
Video proxies are ordinarily made to stand in for raw footage during the editing process. The reason is simple: smaller records are easier to work with because they load more quickly and use less processing power.
Once the editing part is done, you can return to the previous quality of the video with a couple of clicks in your editing software.
How does a proxy work in video editing?
The process of working with proxies is easy to understand. It has only a few steps:
➡️ Get proxy files from your camera, or generate them in editing software.
➡️ Send proxy files to your editing team, and let them do their magic.
➡️ Open a project file from your editors, in your editing software. Connect the original media files to it and render it in 4k.
How to make a proxy in your video editor software
Creating a proxy video is an automated process. However, every software program is unique, and the Adobe Premiere Pro proxy workflow will differ from that in Final Cut Pro or DaVinci Resolve.
There is one important note to consider. When converting the footage to proxy videos, you need to select the correct options to ensure a quality editing process in the future. Otherwise, your editors will face difficulties working with color grading and correction.
Our recommendation is to choose the resolution and video compression format as described in the table below. A good practice is also to leave the previous size and decrease the bitrate.
| Original Resolution | Recommended Proxy Resolution: | Compression Format: |
| UHD(4k) 3840 x 2160 | 960×540 (1/4 size of full res) or 1280×720 (1/3 of resolution) | ProRes, DNxHD or Cineform |
| Cinema 4k 4,096 x 2160 | 1024×540 (1/4 size of full res) | ProRes, DNxHD or Cineform |
| FHD (Full HD) 1920×1080 | 480×270 (1/4 size of full res) | ProRes, DNxHD or Cineform |
Below are video instructions for creating proxy files in different editing programs.
Creating Proxies in Premiere Pro
Creating proxy media in Adobe Premiere Pro is pretty straightforward. You need to have Adobe Media Encoder installed (it’s included in your Adobe subscription). You should take the following steps:
- Choose source files in the project window → right-click → Proxy → Create Proxies
- In the Create Proxies window select the proper format and preset → specify the location where you want to store created proxies files → click OK
- The Adobe Media Encoder program will automatically open. The process of transcoding the source files into proxies will begin.
💡 We recommend switching from H.264 to something like ProRes Proxy. These files are created for fast editing and are still highly compressed to not take up a lot of space on your drives.
Creating Optimized Media in Final Cut Pro
Apple’s Final Cut Pro X has a new proxy workflow. There are two ways to create proxies:
Manual
- Upload all the footage into the project → right-click in the Footage section.
- In the pop-up window, click Transcode Media. Choose the proper codec and frame size. Transcoding will take some time.
- Right-click on a library name → Copy to Library → Save as “Proxy.”
- In the “Include” section, choose Media and Proxy media → click OK.
- In a preview window, click on View.
- Select Proxy Only.
- Archive the library.
- Send the Proxy library to us.
During Import
- In the Settings window, in the Import tab, tick Create Proxy Media. All the imported files will be converted into Proxies.
- In order to find proxy files, you need to find a project file → right-click on the file → select Show Package Content.
- Go to the Footage folder → choose Transcoded Media.
- Then the final proxy folder where all the proxy files you’ve converted for this project will appear.
Creating Proxies in DaVinci Resolve
Version 17 or older is required to create proxy files in DaVinci Resolve. The workflow is as follows:
- Go to Project Settings → select Proxy Generation Location path and the proxy format you need
- Select all folders and then all the files that you need to convert to proxies → right-click → Generate Proxy Media
- Wait for DaVinci to create proxies.
- In the Media Pool, find the Proxy Media Path column next to the file name (Clip Name) – it displays the path where your proxies were created.
How to send proxy files?
Once you’ve created proxy files, find the folder with them (we recommend naming this folder Proxy) and upload them to Dropbox or any other cloud storage service you agreed to use with your editing team. Make sure that all files have been uploaded there. It’s better to double-check the size of the folder you sent and the size of the folder editors received.
How to link existing proxy files?
You should pay attention to the naming of proxy files. If the names and extensions of proxies match the original ones, then all proxy videos from the timeline will automatically be linked to the original ones, and you can easily switch between them.
How to switch between proxy and original file?
Once you have received the project file from your editors, the final step is to open it, link the original files, and render them in high quality.
In order for the video to open and work correctly, it is important that your editing team use the same or an earlier version of the editing program you use. For example, if you work in Adobe Premiere Pro 2020 and your editors work in Adobe Premiere Pro 2022, there might be issues when you link original files. Be sure to discuss the version with your editors in advance.
To make things easier, we have recorded short guides on switching back from proxies to original media in all three programs:
Adobe Premiere Pro
- Select original footage in the project window (right-click) → Proxy → Attach Proxies
- Сhoose the location with proxy files
- Select the necessary proxy files → OK
Final Cut
- Click File → Open Library → Other → Locate
- Select Proxy Library → Open → Drag Proxy Library to your Original Library
- In the popup window, select Library Without Media → OK
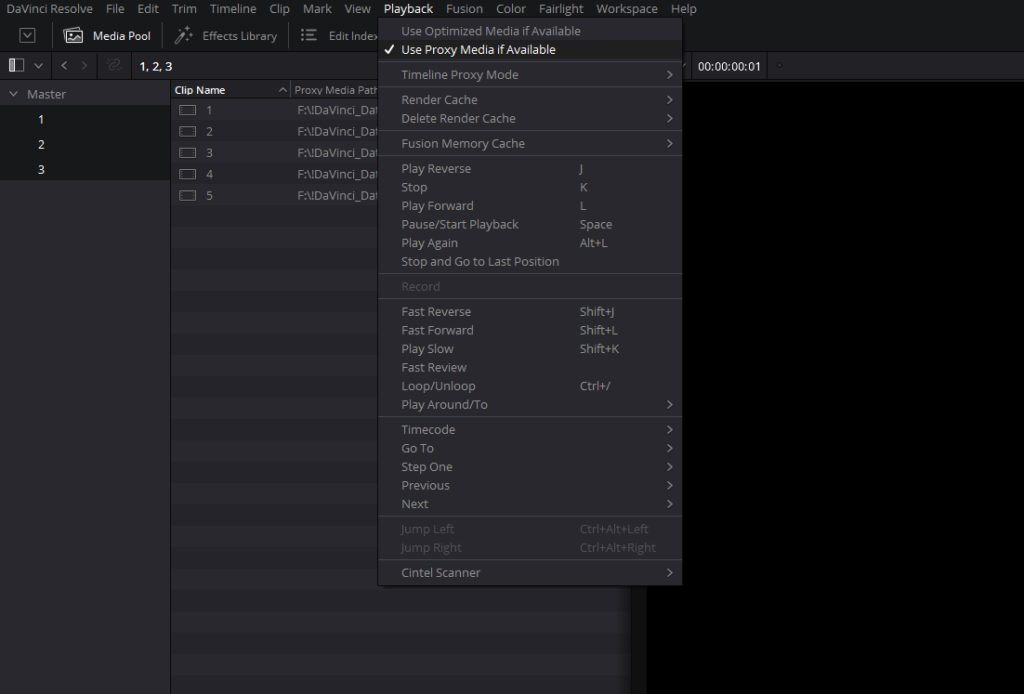
Davinci Resolve
- Select the Playback button in the top panel
- Remove the check mark on Use Proxy Media if available
Pros and cons of proxy video editing
There are pros and cons if you decide to transcode media and use proxy files. Let’s take a closer look.
Pros of using proxy media
- The sending process will be quicker.
- Your editors can do their job a bit faster.
Cons of using proxy media
- The previews will also be in low resolution.
- You will need to spend additional time on creating proxy files.
- If you create proxies in a too low resolution, there can be issues with color grading
Conclusion
Using proxies makes a lot of sense if you have a slow internet connection and if you love adding the final touch to projects after your editors completed their job. However, it requires some extra steps from you and more advanced collaboration between the videographer and editor in order to build a mutually convenient workflow and assure getting the best quality films in the end.
We hope this article was useful for you! If so, please share it with your friends and colleagues who might find it helpful:
—
FAQs
Can I upload proxy files instead of full-resolution footage?
Yes. It’s a great option if your upload speed makes sharing 4K originals a struggle. We edit using the proxies, then send you back the project file so you can link your original media and render the final film in full quality on your end. Just follow the recommended proxy settings, since proxies created at too low a resolution can cause trouble with color grading. And confirm editing software versions with us in advance, so everything links up smoothly when you switch back to the originals.
What happens if my editor works in a newer software version than mine?
Problems can show up at the worst moment, especially when you open the project to relink originals and render. A Premiere Pro project created in a newer version may not behave properly in an older one. The fix is preventive: agree on software versions with your editing team before the project starts, with the editor matching your version or using an earlier one.
My proxies won’t relink to the original files. What’s usually wrong?
Naming, most of the time. Automatic linking depends on proxy file names and extensions matching the originals; when they match, timeline clips connect to the full-quality files and switching between them is painless. Renamed files, or proxies generated with altered naming patterns, break that match. Checking names before sending footage costs a minute and saves a headache.
Is there a downside to making proxies as small as possible?
There is, and it shows up in the grade. Proxies compressed below the recommended sizes, around one quarter of the original resolution in formats like ProRes or DNxHD, can create real problems for color correction and grading. The recommended settings already shrink files enough to upload comfortably, so going smaller saves little and risks the part of the edit couples notice most.
Do I need proxies at all if my internet is fast?
Less urgently, but the math is still worth running. Modern 4K wedding projects can reach a terabyte, which strains even good connections, and proxies also help editors work faster regardless of how the files arrived. Against that, proxy creation takes your time and adds workflow steps. With genuinely fast upload speeds and modest footage sizes, sending originals directly is reasonable.
—
Terminology
Proxy video – a simplified, lower-resolution copy of the original footage with a reduced bitrate, created for faster editing and easier file transfer. Once the edit is done, the originals are reconnected with a couple of clicks for the final high-quality render.
Bitrate – the amount of data a video carries per second, which largely determines file size and quality. Lowering it is the main way proxies shrink massive 4K wedding footage into files that upload quickly.
Transcoding – converting video from one format or resolution to another, which is how editing software generates proxy files from the originals. Premiere Pro hands this job to Adobe Media Encoder automatically.
ProRes – an Apple compression format built for smooth editing, recommended over H.264 when creating proxies. ProRes proxy files play back easily while staying compact on the drive.
Relinking – reconnecting a project to different versions of its media, such as swapping proxies back to the original 4K files before the final export. It works automatically when proxy file names match the originals exactly.
Optimized media – final Cut Pro’s term for transcoded, edit-friendly versions of footage, covering the same idea as proxies. The program can generate them manually or automatically during import.
Render – the final processing step where the editing software exports the finished wedding film at full quality. After the originals are relinked, rendering in 4K produces the deliverable version of the project.