How can you transform ordinary sound into exceptional audio for your wedding films?
In wedding video editing, audio mixing plays an important role in creating standout highlights. Without proper work with audio, recordings of speeches or letter readings might come off as too quiet, muffled, or plagued by background noise. Professional sound mixing enhances sound quality, providing clarity and richness. Therefore, to strike the perfect balance between video and audio content, it’s essential to give careful consideration to this process.
Audio Plugins and Tools We Use
So, what’s our approach to nailing the perfect result in each project? Above all, we choose the right software for mixing audio for video. While there are many options out there, we primarily rely on the Adobe suite, specifically Adobe Audition, because it’s highly convenient for working with speeches.
Once we’ve settled on the sound mixing software, the next natural question is: which tools within this program should be employed to achieve professional quality? In this case, we navigate to the Effect Rack panel and load the preset that is used by every editor in our company. All third-party plugins mentioned in this article support Davince Resolve, Premiere Pro, and Final Cut.
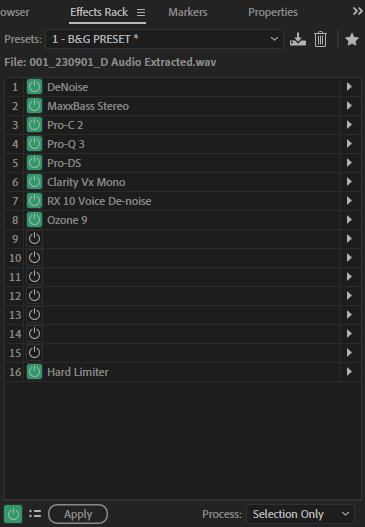
As seen in Fig 1, the preset makes use of a variety of plugins, totaling 9 – the essential minimum for audio mixing. However, the list may extend based on how the speech was recorded. In practice, each audio can be “unique” due to factors like the microphone placement on the groom or bride, how a person held the microphone (close or far from the mouth), and so forth. Let’s consider a typical scenario of recording an outdoor ceremony, where the audio was captured at -12 dB with some background nature noise. Our aim is to better separate the voice from the background noise (not entirely) and craft a pleasantly compressed speech sound, ensuring we can pick up even the softest words without having to rewind the video.
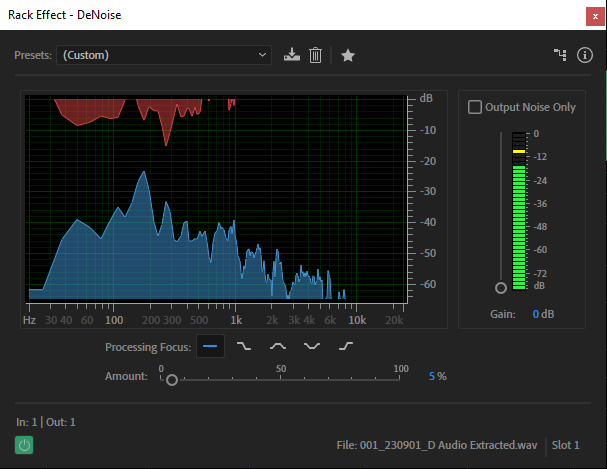
1. DeNoise
The first thing we do is add DeNoise (the standard Adobe plugin). We minimize the noise by setting the Amount to 5-10%.
2. Waves MaxBass
Moving on, we frequently employ the Waves MaxBass plugin. Why? Using MaxBass enables us to attain a more robust and impactful bass sound without the concern of speaker overload. It goes beyond simply boosting existing low frequencies; it creates higher frequency harmonics derived from the existing bass content. We apply the standard Medium preset, set the application frequency between 150 and 256 Hz (depending on the speech), and fine-tune the MaxBass knob to achieve a satisfactory outcome.

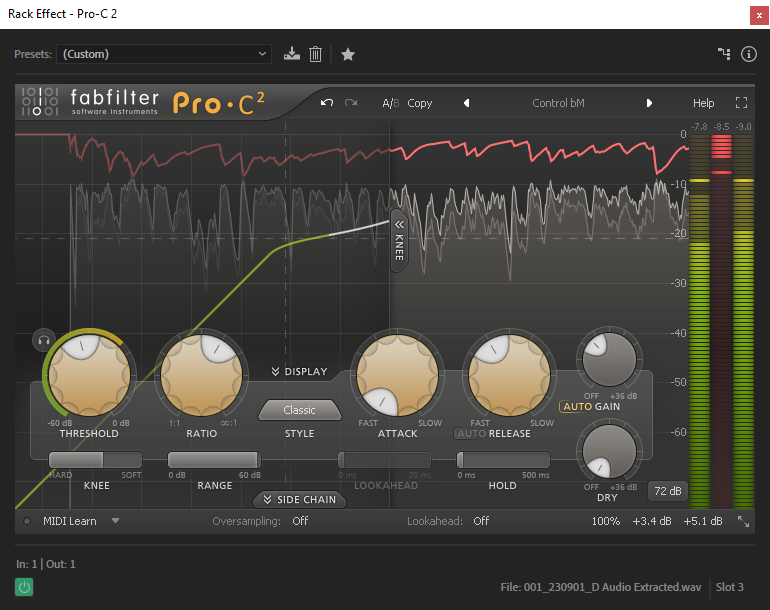
3. FabFilter Pro-C2
Next in line is the FabFilter Pro-C2 compressor. Compression plays a vital role in maintaining a consistent volume in speech, especially since individuals not well-versed in public speaking often struggle to sustain a uniform volume level over an extended period. Their speech tends to vary between loud and quiet sections. This is precisely where a compressor becomes useful in evening out these fluctuations.
With the Pro-C2 compressor, we opt for the Vocals – Control bM preset. Here, we fine-tune the Threshold parameter (indicating the signal level at which compression kicks in), Input Level, and Output Level. Our goal is to balance the last two parameters until they match in volume because, post-compression, the overall audio volume should not be louder. The application of the compressor results in quieter sections becoming louder and louder parts becoming softer, achieving an overall balanced volume.
By the way, why do we use the Pro-C2 compressor after Waves MaxBass? That’s a good question. If we were to use Waves MaxBass after the Pro-C2 compressor, the audio might distort, and the volume of low frequencies could go above the 0 dB level. The program would intentionally truncate anything beyond 0 dB, causing a distortion effect. That’s exactly why, following Waves MaxBass, the compressor can be configured to avoid exceeding a volume level of 0 dB.
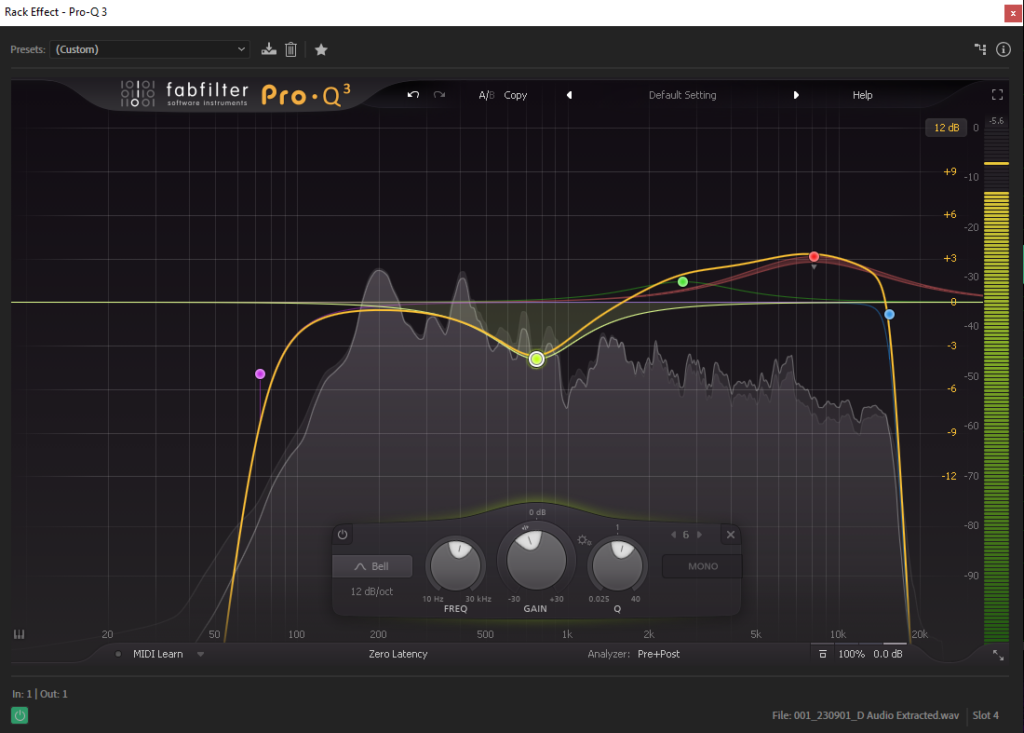
4. FabFilter Pro-Q3
The next plugin on the list is the FabFilter Pro-Q3 equalizer. An equalizer is the most vital tool in working with speech (after compression, of course). Proper use of an equalizer can significantly enhance the quality and clarity of speech in various situations. What steps do we take in speech processing?
- We cut out low frequencies below 100 Hz because they are unnecessary, and human speech isn’t audible below 100 Hz.
- We filter out frequencies above 16 kHz as they don’t contain useful information. Often, these frequencies harbor high-frequency noises that only disrupt audio listening.
- If needed, we introduce brightness to the sound by boosting the amplitude for high frequencies, as they contribute to the overall brightness.
- We boost the amplitude in the 1-4 kHz range, crucial for speech understanding. Amplifying this range can enhance speech clarity and intelligibility.
In fact, in every audio, we strip away frequencies in the 500-1000 Hz range, resulting in a very pleasant-sounding speech.
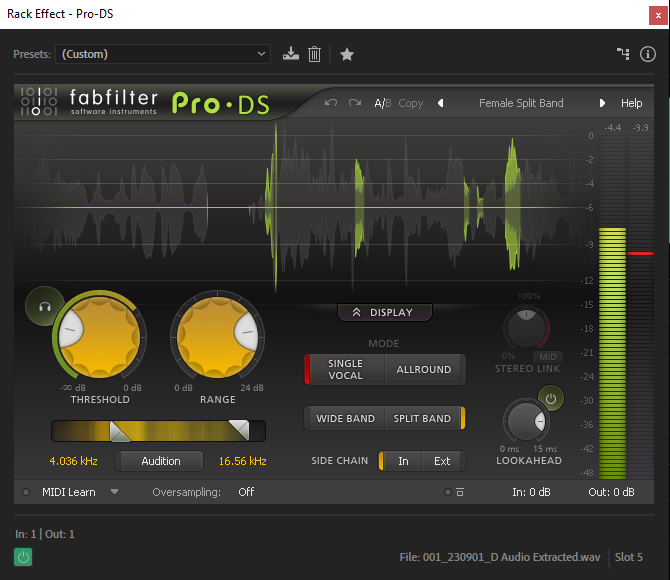
5. FabFilter Pro-DS
After boosting the high frequencies, you might notice a significant increase in hissing and whistling sounds (sibilance). In such cases, it’s not recommended to go back to the equalizer. Instead, you can introduce another plugin – the FabFilter Pro-DS de-esser. It excels at eliminating hissing and whistling sounds, especially in female speech! To achieve this, we opt for the Single Vocal – Female Split Band preset and fine-tune the parameters: Threshold (similar to how a compressor works) and Range (In brief, “Range” determines how effectively the de-esser will “suppress” or “reduce” the level of sibilance).
6. Clarity VX
Now it’s time to tackle the background noise, which is the sixth plugin in the chain. It’s positioned after compression because it’s more effective to remove background noise post-compression. After compression, we boost the volume of quiet parts of the audio, and consequently, the level of background noise increases. For this task, we apply the Clarity VX plugin. It operates based on the artificial intelligence technology developed by Waves. The plugin can identify voices and cleanly separate them even from sharp ambient or background noises.
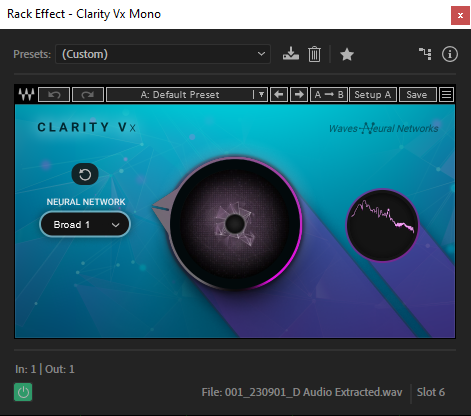
Operating it is straightforward; you only need to turn one large clockwise knob, allowing you to eliminate sound artifacts without harming the source. Typically, turning the main knob to around 25% is sufficient if you want to achieve a natural sound and keep some background noise for the full film. However, if you aim to completely suppress background noise, you can use 50-75%. Clarity VX has a “big brother,” Clarity VX Pro, which we also use in more intricate situations.
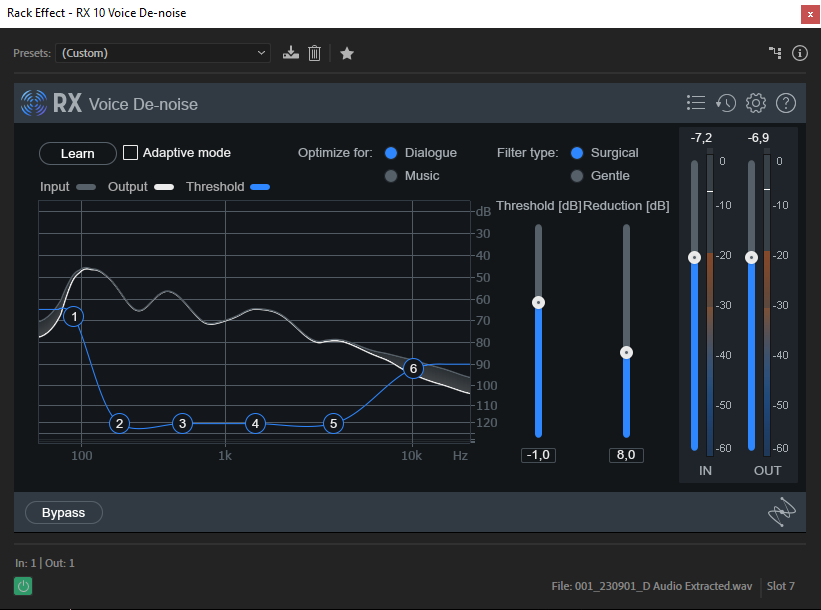
7. iZotope RX 10 Voice De-Noise
The seventh plugin in the lineup is iZotope RX 10 Voice De-noise, capable of providing additional background noise removal. We incorporate it as needed, though we frequently do without it given the excellent performance of Clarity VX. Nonetheless, when required, we utilize the settings (Fig. 8) to specifically eliminate background noise at low and high frequencies.
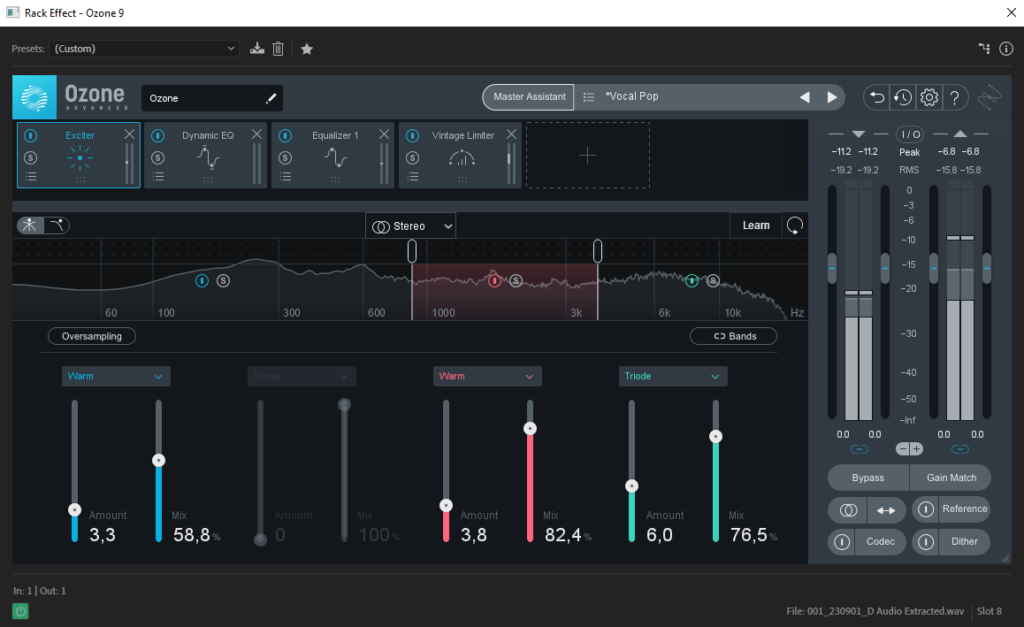
8. iZotope Ozone 9
We don’t overlook the sound mixing stage (Fig. 9), where we can further enrich the audio and make it even more pleasing and vibrant. To achieve this, we employ the iZotope Ozone 9 plugin (as well as version 10 & 11) – a software package for mastering that provides an array of tools to enhance and optimize audio sound (including musical tracks). It encompasses equalizers, compressors, exciters, maximizers, and various other instruments for attaining a professional sound. Given our penchant for presets, we don’t shy away from them here either! We opt for the Vocal Pop preset and fine-tune each built-in plugin to suit our audio. One of the delightful enhancements comes from the Exciter plugin, which introduces harmonic distortion to the audio signal to “liven up” or “enhance” its sound.
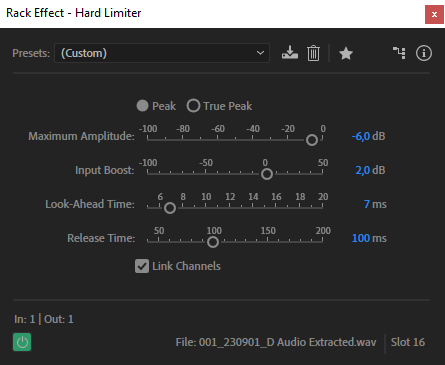
9. Adobe Limiter
Toward the end of the process, we incorporate the standard Limiter from Adobe because it avoids introducing any distortions in the final stages of proper sound mixing for video. While you can utilize the limiter in Izotope Ozone 9 (10, 11) and make adjustments, if audio mastering isn’t necessary, we opt for the standard Limiter from Adobe, with a preset at -6 dB and the Input Boost set to +2 dB.
10. AI Tools
Here, we wrap up the audio mixing software we used – Adobe Audition. And we’d like to touch on the scenario where the audio has poor quality or there’s a need to process speech recorded from a camera. We recently posted an article on recording audio at weddings, so please check that out for tips on capturing the perfect sound for your highlights. However, if you ever find yourself needing to work with less-than-ideal audio, we also leverage the AI audio mixing tool for video production from Adobe: Adobe Podcast AI – Enhance Speech. It aids in improving sound in challenging situations, but as of the fall of 2023, it may still have limitations in handling incorrect audio, potentially introducing undesired distortions in speech.
When you entrust to edit your wedding films to us, rest assured that we give just as much attention to audio as we do to video files.
FAQ
Sound Mixing is the technical process of working with each audio file (or audio channel), where audio plugins are applied, as described above, tackling tasks like compression, equalization, and the like.
Sound Editing is a creative process within editing software, encompassing tasks such as tweaking speeches by snipping unnecessary phrases from dialogues and handling both music and speeches concurrently. It involves adjusting the volume of music as necessary. Sound Editing may also cover the Sound Design process, where diverse sounds are blended for a comprehensive and immersive audio experience in the video.
The ideal loudness for background music depends on the context. In filmmaking, it should complement dialogue without overpowering it. Typically, background music levels are set to enhance the mood without distracting from the main audio.
Given that wedding videos are primarily crafted for home viewing on TVs, computers, and smartphones, we make sure to provide a volume buffer for all devices, editing the audio at -6 dB for both music and speeches. When you play the video, your ears will stay intact and healthy – we take care of our clients!
Sound Mixing involves working with each audio file (or audio channel), whereas Mastering is the process of simultaneously working with all audio files (or audio channels) using a Master channel that amalgamates all audio channels. In this process, the editor enhances the sound to make it more vibrant, ensuring that all elements in the audio composition sound like a unified whole.