Good light is the real engine behind cinematic footage, and this thorough guide, made with TLIC Media, gets specific about achieving it. It maps lighting setups for the moments that matter most, letter readings, first looks, speeches, with versions for rooms blessed with window light and for cramped spaces without it. Each scheme spells out key, fill, and back light placement and the mood it produces, dramatic or evenly lit. A reference videographers can lean on for repeatable, cinematic light.
What makes wedding footage look cinematic? Good light is fundamental to ensure that shots are well-exposed, colors are vibrant, and details are clear and sharp. As every couple’s story unfolds differently, understanding the nuances of various light schemes becomes essential for capturing their love story in its truest form.
Together with our clients and friends from TLIC Media, we’ve created a big light guide for wedding videographers, uncovering secrets learned over many years of shooting and editing wedding films.
Good vs Bad Light
To get things rolling smoothly, we’d like to present some examples illustrating how poor light can significantly impact your footage. This way, you’ll understand why it’s so crucial.
What light schemes can be used at a wedding?
Here, along with the TLIC team, we present the following light schemes:
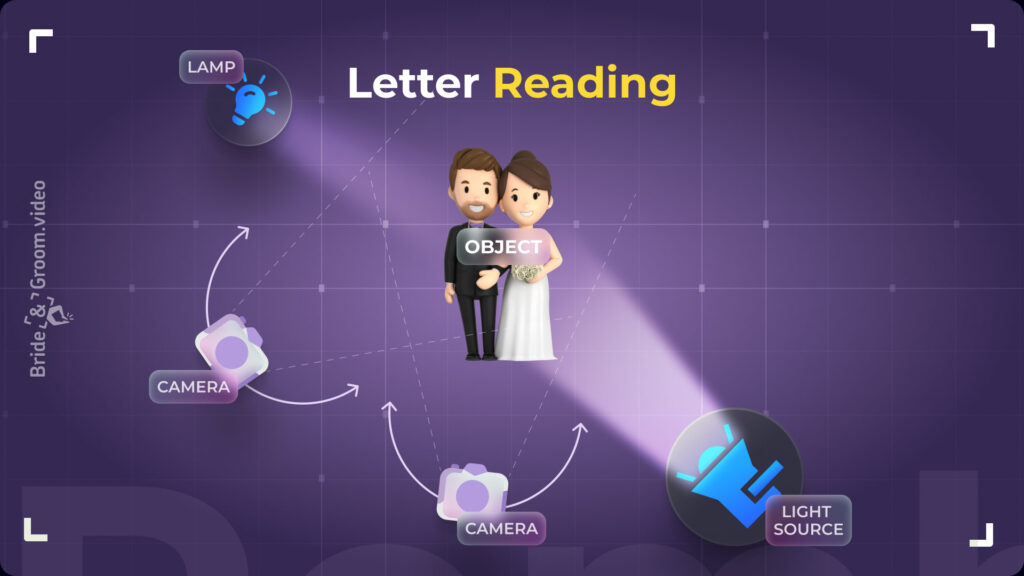
1. Letter Reading
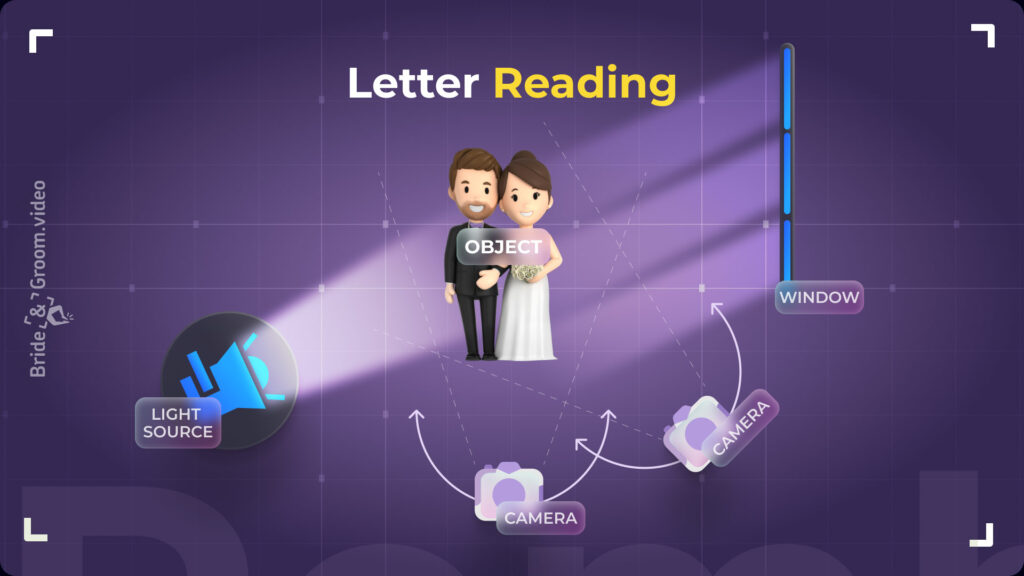
This setup works best when you have one person in the room and there’s a window available, providing natural light for the scene.
- We employ the Rembrandt Light setup for this scenario.
- The window light serves as the key light, casting the primary illumination on the scene. An additional light source acts as fill light, smoothing out any extra shadows on the subject’s face.
Note that the additional light source should be dimmer compared to the window light.
2. Leather Reading v2
This version of the setup is quite similar to the previous one, but it differs in that it doesn’t rely on natural light and is tailored to fit smaller spaces or rooms.
It’s notable that this setup will have a more visually dramatic impact. This is because it utilizes only a single key light.
- For this light arrangement, we employ an incomplete 2-point Light configuration.
- To achieve a heightened dramatic effect, we use only the key light and an additional rear light.
- To achieve the desired dramatic effect, position the key light at a 45-degree angle to the subject and slightly above head level. This setup ensures that one side of the subject’s face is perfectly illuminated while the other side forms a triangular shadow (a photo can be added for reference).
- To prevent the scene from becoming overly dramatic and the subject from blending into the background, it’s crucial to add an additional light behind the subject, also at a 45-degree angle but positioned opposite to the key light. It’s important to note that the light should illuminate the subject’s head (and may also encompass the back and shoulders) – this ensures the subject stands out from the background.
- Ideally, you’d also incorporate lamps or small light panels into the background. This further separates the subject from the background and adds ambiance to the scene.
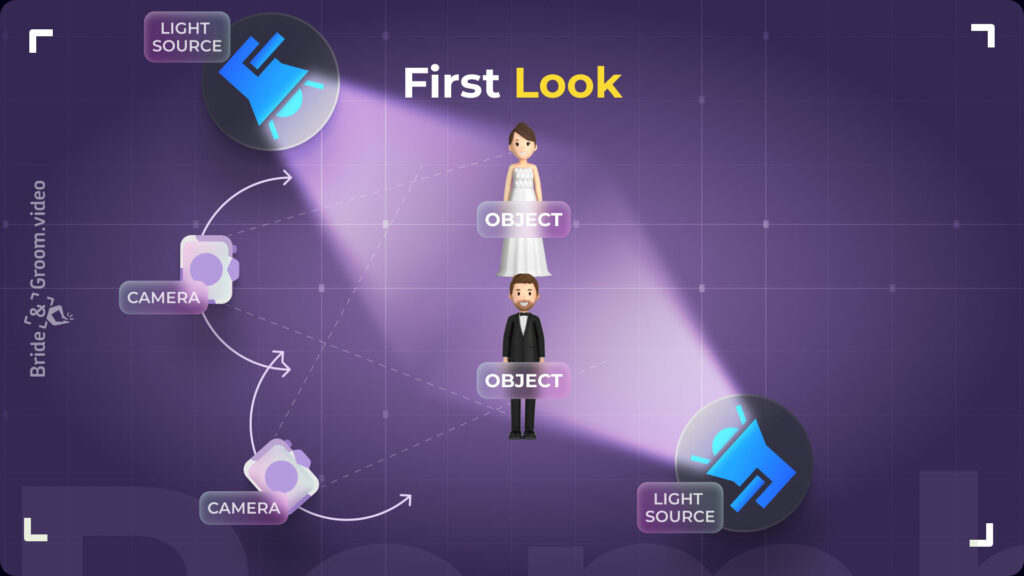
3. First Look

This scene is somewhat unique as it combines two light setups: 2-point light + Backlight. Here, we depict the initial encounter between the bride and groom, but this arrangement can also be used for the first meeting with the bride’s parents and bridesmaids.
- The primary light source here is the window light as it provides the most powerful illumination and evenly fills the scene with light.
- Additionally, two supplementary light sources are used, positioned at a 45-degree angle relative to the subjects. These two light sources should have lower light intensity compared to the window light.
An important point is that if the shoot is conducted from different angles, there will be a change in the light setup. If the camera is positioned in front of the window, it will be Backlight. However, if the shoot takes place near the window, it will be the classic 3-point light.
4. First Look v2
This light scheme presents one of the options for tricky situations: without natural light from a window and in case there’s limited space for shooting. Overall, this light arrangement resembles the second image.
- Here, an incomplete 2-point Light setup is utilized.
- In this scene, two primary light sources are used, each of equal importance. They are positioned in front and behind at 45-degree angles from opposite sides. This ensures effective illumination for both the bride and groom.
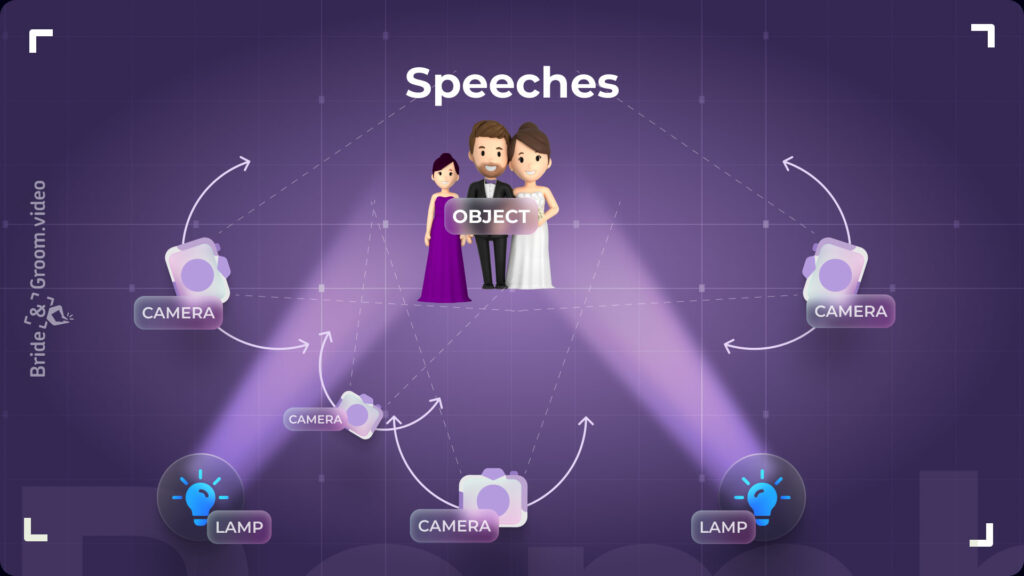
5. Speeches
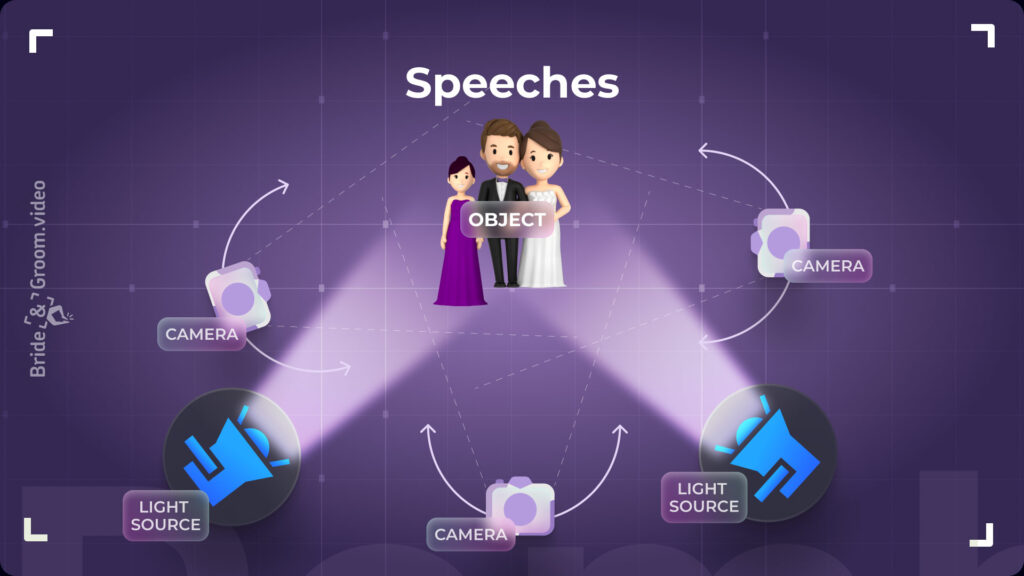
In this scene, we’re using the Rembrandt Light setup.
- We’ve got 2 light sources: the key light and the fill light. Both are set at 45-degree angles from the subject.
- This ensures the scene is evenly lit without any extra shadows since it’s a cheerful event with speeches from friends and parents. We’re not going for drama here.
6. Speeches v2
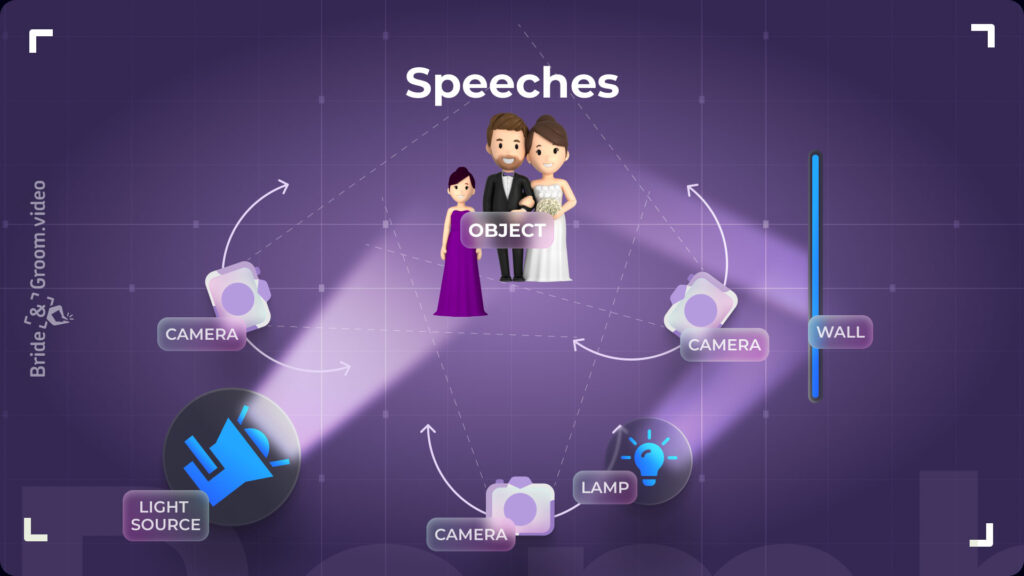
Here we present two light schemes at once: Book Light and Rembrandt Light. These setups are ideal for use in small spaces.
- The main light is directed towards the wall, where it reflects to evenly illuminate the scene. This setup closely mimics natural daylight.
- Additionally, there’s fill light positioned at a 45-degree angle to prevent unwanted shadows.
It’s worth mentioning that because the light is aimed at the wall, the intensity of illumination decreases, so adjustments need to be made individually. Moreover, this setup may not suit everyone, as it requires powerful light sources for most applications.
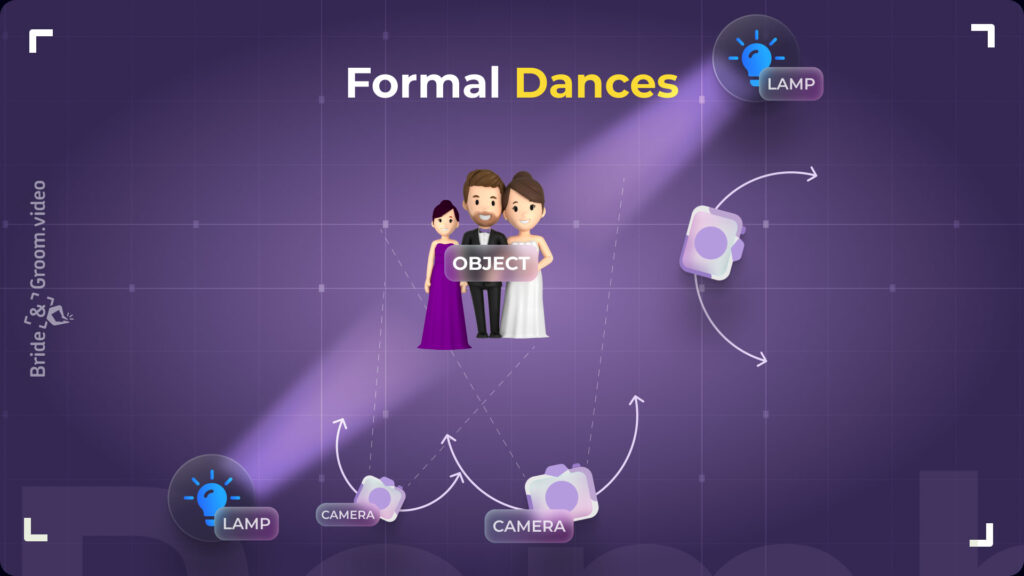
7. Formal Dances
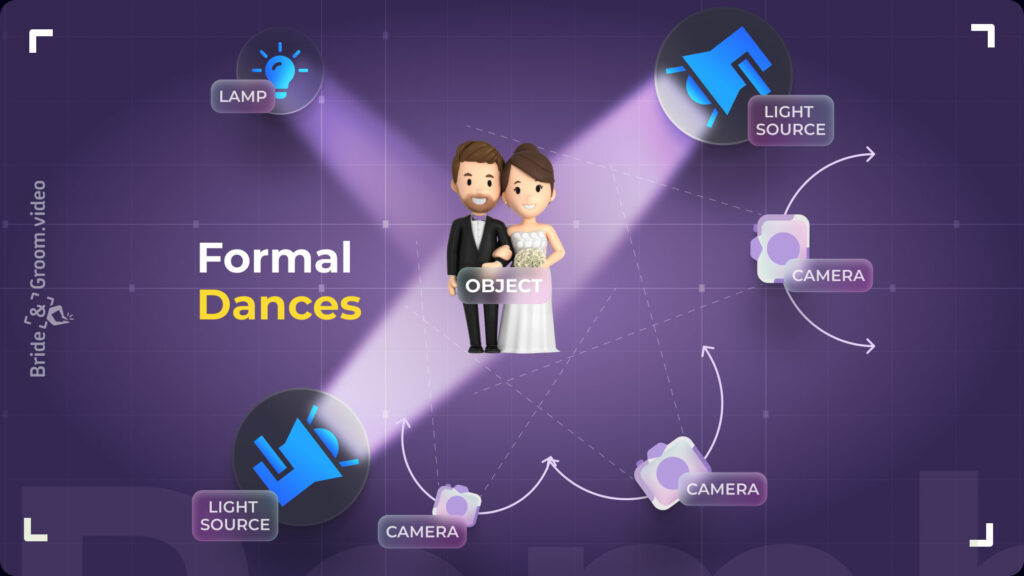
This scene employs the 3-point light setup. It’s a classic arrangement that ensures high-quality filming of the couple’s dance from any angle.
- In this setup, three light sources are utilized, each positioned at a 45-degree angle to the subject.
- The key light (primary light) produces the main illumination that will highlight the couple.
- Fill light helps to mitigate any excessive shadows in the scene.
- Another additional light placed behind the subject will separate them from the background.
- With this light scheme, the couple will stand out as the primary focus of the scene.
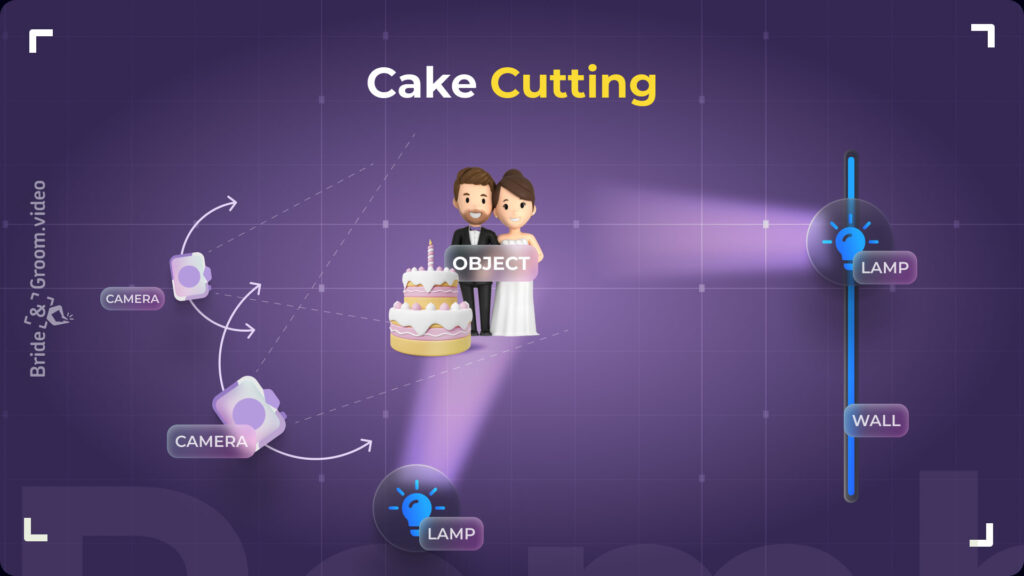
8. Cake Cutting
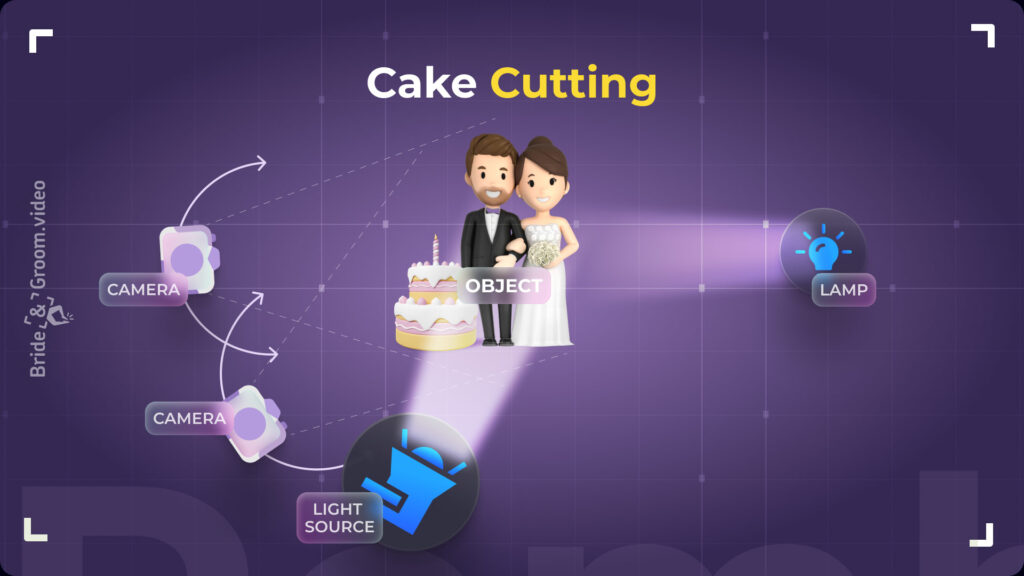
In this scene, we’ll use an unfinished 2-point light setup. We’ll employ two light sources:
- The key light will be the main source, illuminating both the cake and the couple.
- Positioned behind them, an additional light source will help separate the couple from the background.
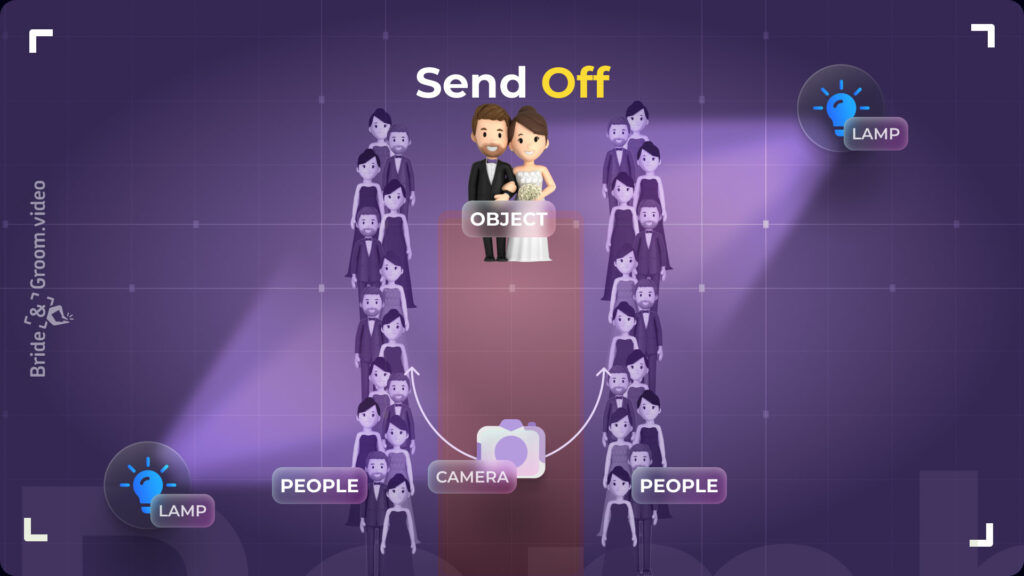
9. Send Off
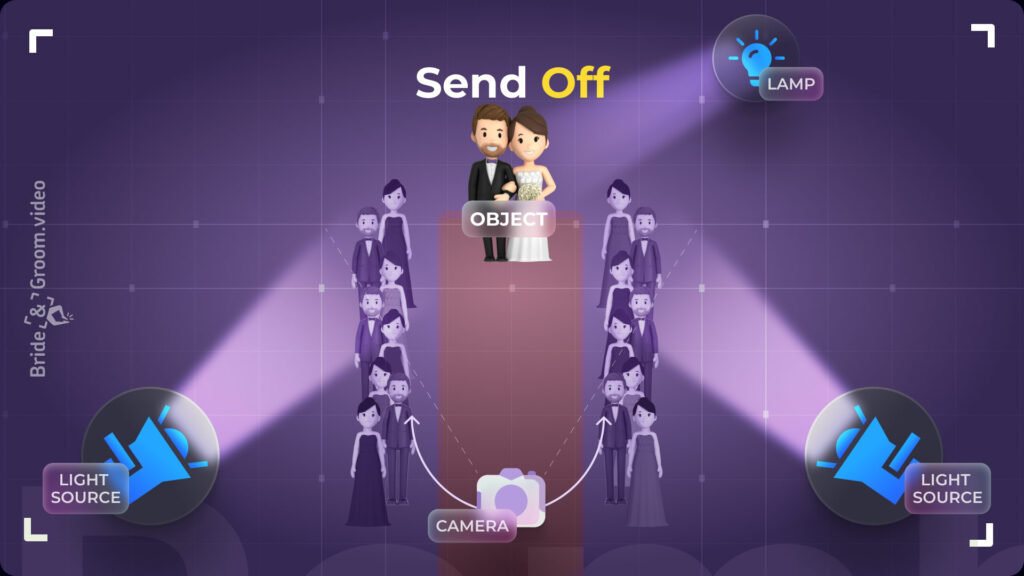
In this scene, we’re employing the 3-point light setup. It’s a classic arrangement that helps accentuate the subject:
- Three light sources are used in this setup, all positioned at a 45-degree angle to the subject.
- The key light (main light) generates the primary illumination, highlighting the couple.
- The fill light prevents excessive shadows in the scene.
- An additional light placed behind the subject helps to separate them from the background.
- This light scheme ensures that the couple is perceived as the primary focus of the scene.
Recommendations from TLIC Media
In these light setups, you can also incorporate softboxes if you prefer softer shadows on the couple’s faces.
What are the pros and cons of additional light at a wedding?
👍 Pros:
- Atmosphere Enhancement: Extra light can cultivate a warm and romantic vibe, amplifying the overall ambiance of the festivities.
- Photo and Video Quality: Proper light facilitates lowering the ISO setting on the video camera, resulting in a wider dynamic range and higher-quality video footage.
- Accentuation of Decor: Light can accentuate specific decor elements or areas of the venue, such as the sweetheart table or dance floor.
- Design Flexibility: Utilizing various light options like fairy lights, LED strips, and projectors allows for the creation of unique light effects that complement the wedding style and theme.
- Safety: Additional light ensures better visibility during low-light periods, contributing to guest safety.
👎 Cons:
- Cost: Professional light gear and its setup can significantly inflate the wedding budget.
- Installation Complexity: Logistics and venue capabilities need to be considered for placing and connecting light gear.
- Risk of Equipment Damage: There’s a chance of guests damaging equipment during the wedding, especially on the dance floor.
- Risk of Overload: Excessive use of light effects can create discomfort for guests and detract from key moments of the festivities.
- Weather Dependency: Outdoor weddings are subject to weather conditions that may limit the use of certain types of light.
- Need for Experts: Working with professional light gear may require the assistance of qualified specialists, increasing overall expenses.
Basic light schemes
Now, let’s circle back to the fundamental light schemes that every wedding videographer ought to master. They form the backbone of successful wedding footage.
Rembrandt Light
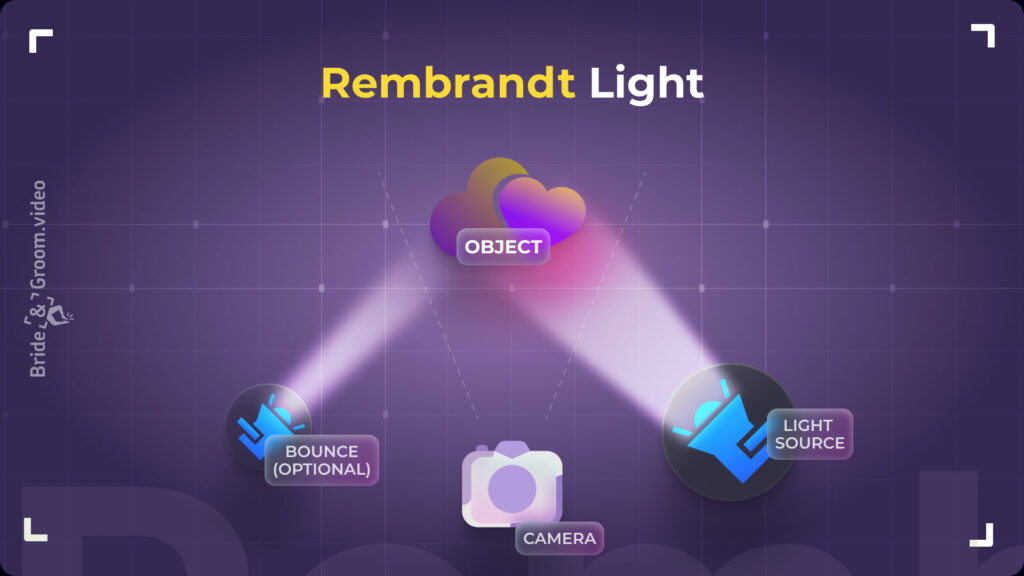
This is a setup that relies on two light sources (main and fill). These lights are placed at a 45-degree angle to the subject.
3 Point Light
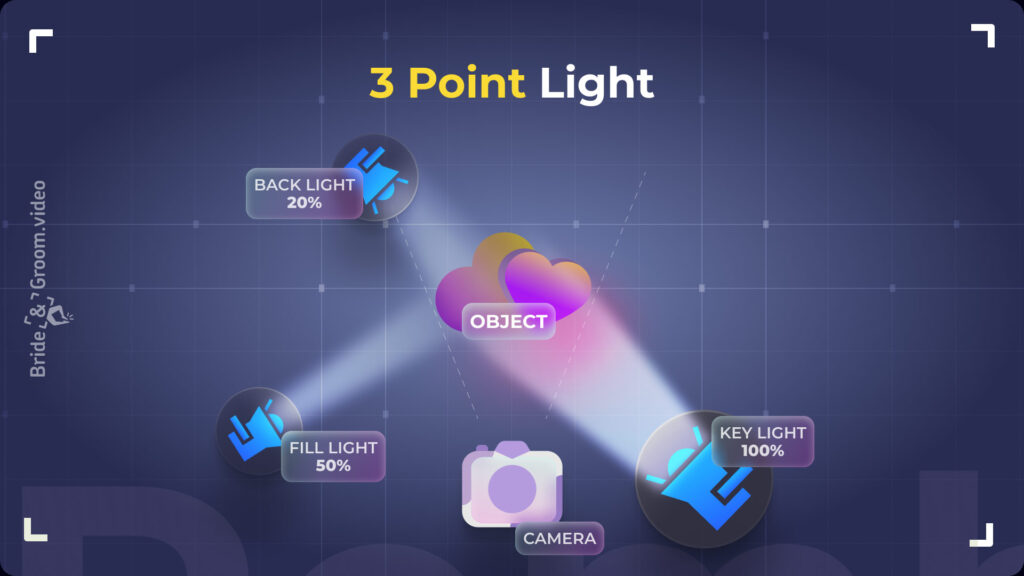
This is a classic light setup that is most commonly used in the industry. The placement of the light sources closely resembles Rembrandt light, but it includes an extra light source positioned behind the subject, also at a 45-degree angle.
Book Light
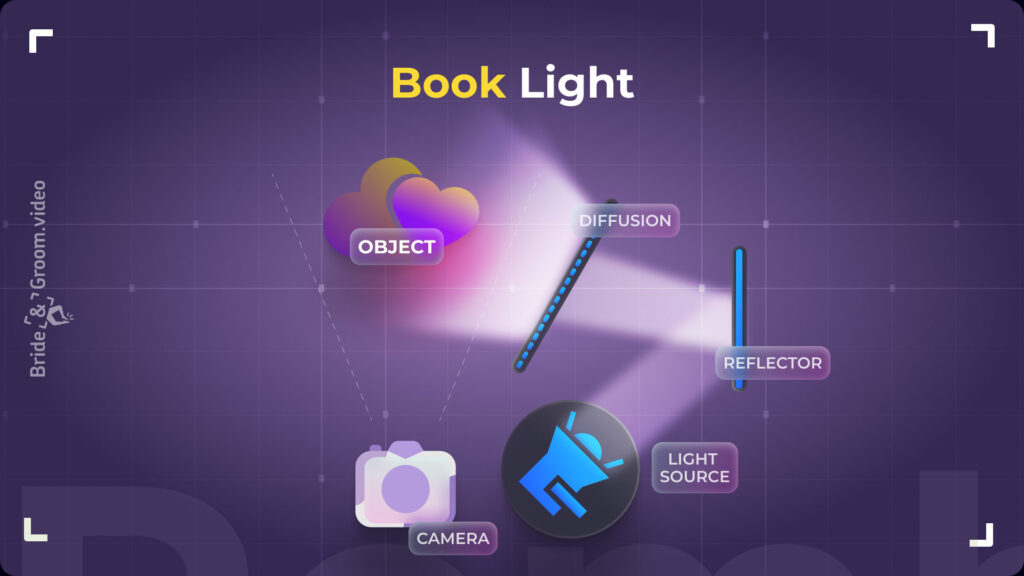
This setup entails utilizing a solitary light source in tough conditions to achieve softer illumination on the subject. The light is angled towards a white wall positioned beside the subject. As the wall catches the directed light, it bounces gentle illumination onto the subject. Ideally, the light reflecting off the wall should also filter through a diffusion screen to disperse the light hitting the subject even more. Nevertheless, there’s a downside to this light setup: it demands a highly potent light source to adequately illuminate the subject.
Backlight
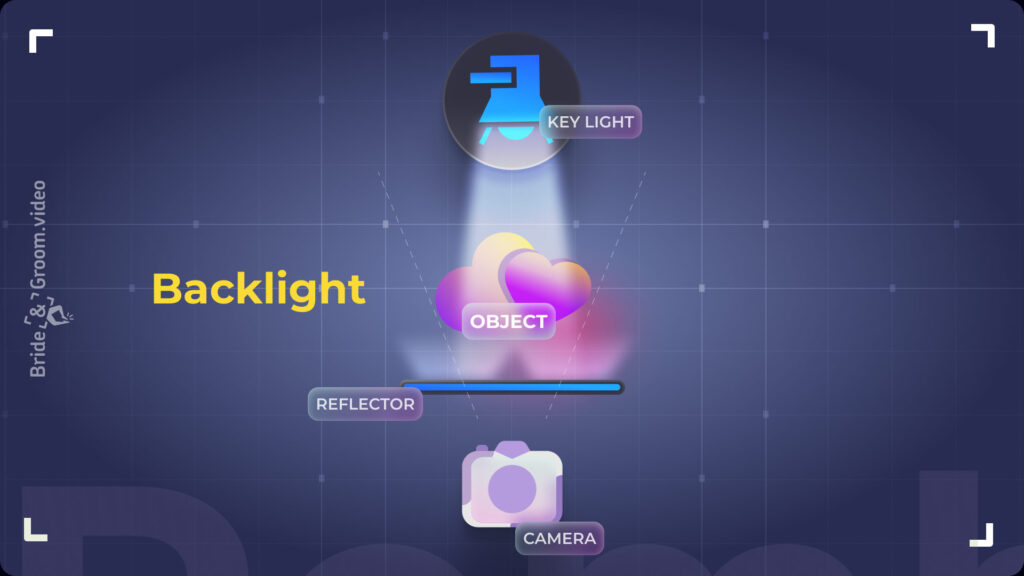
Backlight – in this light setup, usually a single light source is placed behind the subject, enabling the creation of contours and three-dimensional reflections.
It’s worth noting that sometimes an extra reflector is employed in this setup. It’s positioned in front of the subject, redirecting the light reflected from it onto the subject to avoid harsh shadows.
How to use light sources?
When you’re using multiple light sources in your light setup, it’s important to distinguish between them. The primary light source is known as the key light, the next one is the fill light, and any others are considered additional lights. Understanding how to adjust the light for a specific scene is crucial. The key light should be adjusted to properly expose the subject in the shot. As for the fill light, its intensity should vary depending on the subject. For male subjects, the fill light should be set to about 1/4 of the key light’s power, meaning it’s four times less intense. For females, it should be around 1/3. However, keep in mind that these aren’t strict rules – they can and should be tweaked to suit your particular situation.
What parameters should be considered when choosing light equipment?
- Color Temperature
- Measured in Kelvin (K).
- Determines the “warmth” or “coolness” of light. For instance, below 3000K produces warm, yellowish light, around 4000K is neutral white, and above 5000K gives off cool, bluish tones.
- Brightness
- Measured in lumens (lm).
- Determines the amount of light emitted by a source. Higher lumens indicate brighter light.
- Color Rendering Index (CRI)
- Measured on a scale from 0 to 100.
- Indicates how accurately a light source reproduces colors compared to natural light. A high CRI (>80) is preferred for tasks requiring precise color representation.
- Light Directionality
- Encompasses diffused light (for overall illumination) and directed light (for highlight or task-oriented light).
- Considering the light’s spread angle and the capability to adjust its direction are both important factors.
- Energy Efficiency
- Compares the power consumption (Watts) to the light output (lumens per Watts).
- Opting for energy-efficient bulbs (like LEDs) cuts down on energy usage and extends their lifespan.
- Design and Style
- Should match the overall interior decor and have suitable mounting options (ceiling-mounted, wall-mounted, desk lamps, etc.).
- Considering the size and shape of light fixtures is crucial for ensuring they blend seamlessly with the surroundings.
- Durability in Outdoor Conditions
- When it comes to outdoor light, it’s crucial to factor in the fixtures’ ability to withstand moisture, dust, and temperature changes. IP ratings (Ingress Protection) assist in gauging a fixture’s level of protection.
- Light Bulb Type
- Various types of light bulbs (like LED, halogen, fluorescent, and incandescent) offer different features, such as energy efficiency, lifespan, and light quality.
- Connection Options
- It’s important to consider if any special equipment or installation is required to connect the fixtures. Light mobility (operating on 220V mains or batteries) is ideal. The best option is a combination of both (mains and battery-powered).
- Environmental Friendliness
- Some consumers may prefer light that has a minimal impact on the environment, like LEDs, which do not contain mercury, unlike certain types of fluorescent lamps.
- Cost and Long-Term Savings
- While the upfront cost of fixtures and bulbs matters, it’s crucial to also factor in the potential long-term savings from reduced energy bills and fewer lamp replacements.
- Durability and Lifespan
- It’s vital to evaluate the expected lifespan of the light source and how often it will need replacing.
By taking these factors into account, you can make a more informed light decision that aligns with both functional needs and aesthetic preferences.
What additional light accessories may be needed?
1. Reflector
A reflector is a small accessory made of sturdy material that attaches to a monoblock and covers it like a bowl. Typically, it’s no more than a few inches long. Thanks to its shape and material, the inner surface of the reflector directs the flash’s light onto the subject in a focused beam rather than scattering it in all directions.
Reflector – a small, compact attachment for studio flashes. It emits directional, hard light with deep shadows, enabling voluminous, contrasty video shots.
A reflector produces hard light, evident in its deep, sharply defined shadows, strong contrast between dark and light areas in the video, and bright, pronounced highlights. Additionally, hard light better reveals the texture of skin, clothing, and objects.
Thanks to these reflectors, they are used for:
- Dramatic, deep psychological portraits;
- Bold, stylized fashion shoots;
- In male portraiture to accentuate ruggedness;
- In female portraiture to showcase the energy and a vibrant, striking look;
- In product videography, where it’s crucial to emphasize the material of the product.
Types of Reflectors
Reflectors used in photography vary in shape and color on the inner surface, enabling their versatility for different purposes.
Classic Reflector

This attachment is typically made of sturdy material and measures between 20 to 40 centimeters in length. Its shape resembles a tapered bowl, with the mounting located at the narrower base for easy fitting onto a light.
Background Reflector
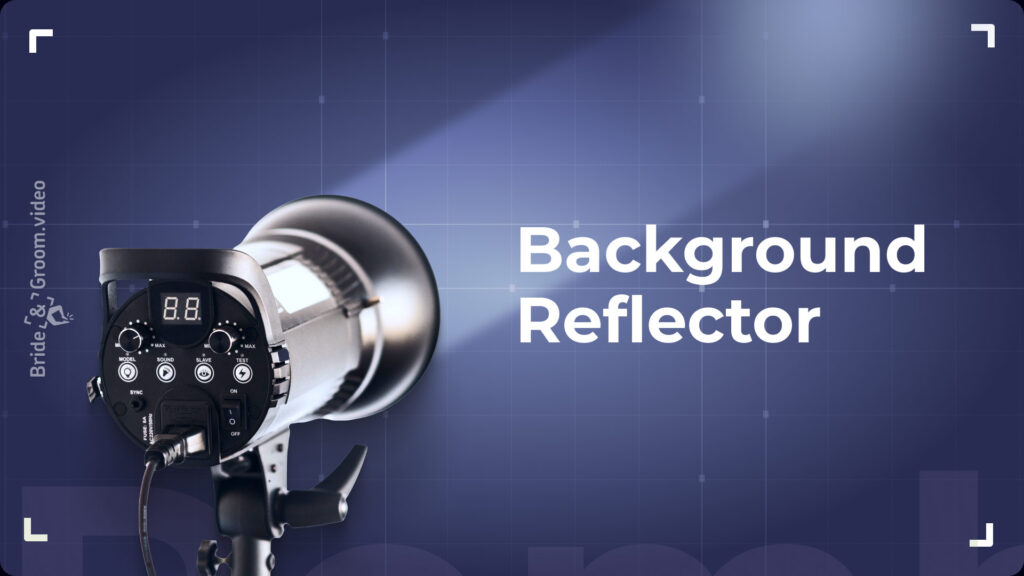
This wide tube gradually expands from the mounting point outward, featuring a sharp, angled edge. Thanks to its design, the reflector illuminates only the background area, cutting off light without affecting the subject or reaching the camera.
2. Softbox.
A softbox is used to scatter harsh light beams. This is its main and sole function. The softbox contains a membrane (which diffuses) and a reflector to direct the light.
The features of a softbox differ based on the density of the membrane and the shape of the reflector.
- Density options include 1/2, 1/4, or 1/8. Density determines how soft the light will be on the subject. A significant drawback of increasing density is that less light can pass through the membrane, and the higher the density, the less light will pass through.
- The shape of the reflector also varies: it can be square, rectangular, octagonal, and so on. The tasks you need to accomplish depend on the shape. A square shape is versatile, while a rectangular one is necessary for illuminating a long object (whether vertical or horizontal). An octagonal (octabox) shape is used for illuminating a large area within the frame.
It’s also important to understand a simple formula that you’ll need to use when working with artificial light sources. This is the “Inverse Square Law” – the brightness of the shot is inversely proportional to the distance from the light source to the subject. For example, if the light source was 2 meters away from the subject and illuminated with a certain intensity, then if you double the distance, the intensity of the light hitting the subject will decrease by 4 times, and so on (this also works in reverse).
If we compile all this information, two recommendations stand out:
- If the light source can be brought closer to the subject, it’s essential to also use a softbox for softer light on the subject.
- If the distance to the subject is too great and the light source’s power doesn’t permit using a softbox, then it can be omitted, as the light naturally diffuses over distance.
3. LED Panels
Offer uniform light and can be valuable for video production or achieving soft light in photography. They can be mounted on tripods or handheld for dynamic light.
4. Light Stands
Enable adjustment of height and light angle, which is crucial for achieving optimal scene illumination.
5. Barn doors, grids, and other light modifiers
Are utilized to control the direction and shape of the light beam, enabling the focus on specific details or the creation of creative light effects.
6. Battery packs and portable power sources
Offer mobility and independence for light equipment, particularly crucial for shooting in diverse locations without access to the power grid.
Conclusion
By implementing the tips outlined in this post, we believe your wedding films will transcend expectations, becoming true masterpieces that not only delight couples but also attract a growing clientele to your business. Your journey as a filmmaker is ever-evolving, and we invite you to share your insights, tips, and recommendations with us. And if you’re seeking a trusted editing partner to elevate your work to new heights, don’t hesitate to reach out to Bride&Groom.video. Together, let’s continue to create unforgettable moments that stand the test of time.
This article was a collaborative effort, reflecting the insights and contributions of our editing team (Petro Berestenko and Arthur Kinash) and our client, Chris Hiltz, from TLIC. Each brought their unique expertise and perspectives to guide you with easy light setups for any wedding.
—
FAQs
Is the venue’s existing light ever enough on its own?
Sometimes, especially where a strong window can serve as the key light, which several of the schemes in this guide are built around. The trade-off appears as the day darkens: without added light, ISO climbs, dynamic range shrinks, and white balance drifts with the venue’s bulbs. Many videographers shoot natural light by day and bring sources out for the evening.
What are my options if the venue won’t allow big light stands?
Work smaller and indirect. Battery-powered LED panels need no outlets and can be handheld or tucked out of sight, while bounce approaches like the book light setup aim light at a wall instead of directly at guests. Ask the venue what is actually restricted before the wedding day, so you can plan a setup that respects the space and still gives the editor usable footage.
Why do my lit shots look harsh and unflattering?
Probably bare, hard light too far from the subject. Undiffused sources create deep shadows and strong contrast, which suits dramatic portraits but rarely flatters a couple. The fixes in this guide are a softbox to scatter the beam and, thanks to the inverse square law, moving the light closer so the softened source can do its work at lower power.
Should all my lights be set to the same power?
Deliberately not. The key light is set to expose the subject properly, while the fill light usually runs much weaker so the face keeps shape and depth. Equal-power lights can flatten the image and erase dimension. Start with a lower fill level, then adjust to the person, room, skin tone, and mood you want.
—
Terminology
Key light – the primary light source in a scene, responsible for the main illumination of the subject. Every lighting setup at a wedding starts with placing and adjusting the key light, whether that’s a window or a dedicated fixture.
Fill light – a secondary, dimmer light that softens the shadows the key light creates. Setting it to roughly a quarter or a third of the key light’s power keeps faces evenly lit without flattening the image.
Rembrandt light – a two-light setup with the key and fill lights placed at 45-degree angles to the subject. It produces even, flattering illumination and works well for letter readings and speeches.
3-point light – the classic setup of key light, fill light, and a third light behind the subject, all at 45-degree angles. The rear light separates the couple from the background, making it ideal for formal dances and send-offs.
Book light – a technique where the light is aimed at a white wall and bounces back onto the subject, mimicking soft natural daylight. It works well in small spaces but needs a powerful source, since bouncing reduces intensity.
Backlight – a setup with the light source placed behind the subject to create glowing contours and dimension. A reflector in front can bounce some light back to keep faces from falling into harsh shadow.
Softbox – a fabric attachment with a diffusing membrane that turns harsh light into soft, even illumination. Videographers use one when they want gentle shadows on the couple’s faces.
Reflector – a bowl-shaped attachment that focuses a light into a hard, directional beam with deep shadows and strong contrast. It’s used when texture and drama matter more than softness.
CRI (Color Rendering Index) – a 0-100 score for how accurately a light reproduces colors compared to natural light. For wedding video, lights rated above 80 help keep skin tones and decor colors true.
Inverse Square Law – the rule that light intensity drops sharply with distance: double the distance from light to subject and the brightness falls to a quarter. Understanding it helps videographers position lights for the exposure they need.